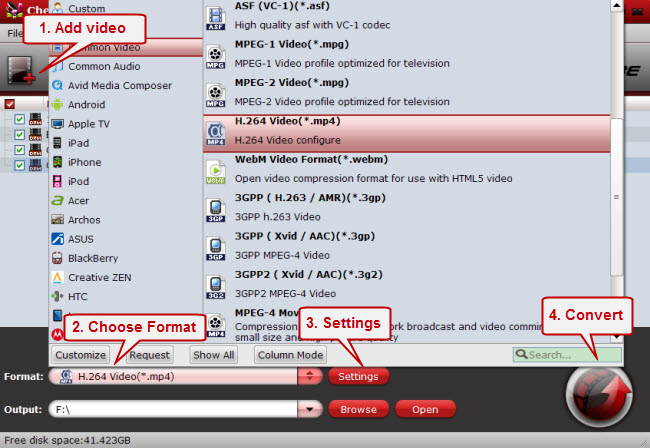
Pages

Thursday, July 30, 2015

How to Play WMA, OGG, FLAC Files in iTunes?

If you are iTunes fan and like using iTunes to organizing your video and audio, you will find that iTunes supported formats are very little. For example, there are only five audio formats that iTunes plays - MP3, AAC, WAV, AIFF, and Apple Lossless. It is a big drawback. Because to audiophiles, FLAC is the first choice for its lossless fidelity but iTunes can’t support it. And WMA/OGG, which are commonly found, are also not accepted by iTunes. Fortunately, getting them to play on your iTunes is possible. 


Under the help of Pavtube Video Converter Ultimate, you can easily realize that playing WMA, OGG, FLAC files in iTunes. It has rich functions:
  • It can convert WMA, OGG, FLAC to iTunes supported formats like MP3, AAC, WAV, AIFF with high audio quality.
  • It enables you to extract iTunes playable audio form Blu-ray/DVD/4K/HD/SD video.
  • In profile settings, you can change audio bitrate, sample rate, audio channel etc to get better audio quality.
  • It also is a brilliant video converter ultimate, which can backup DVD/Blu-ray/4K/HD/SD videos, TV Shows, Music Drama to various video format: M3U8, H.265, MP4, MOV, M4V, AVI, MKV...(Read Review)
Free download and install
          

Other Download:
- Pavtube old official address: http://www.pavtube.cn/blu-ray-video-converter-ultimate/
- Cnet Download: http://download.cnet.com/Pavtube-Video-Converter-Ultimate/3000-2194_4-75938564.html

How to turn WMA, OGG, FLAC to iTunes playable format?

Step 1: Load audio files to the app

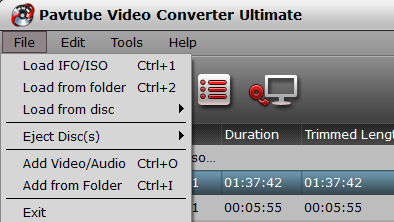
Launch the program on your computer, click "File" menu and select "Add Video/Audio" to import source audio files to the program.


Step 2: Set output format for iTunes

From "Format" drop-down list, select "Common Audio > MP3-MPEG Layer-3 Audio (*.mp3)" as the output profile format.


Step 3: Change WMA, OGG, FLAC audio to iTunes

Start the conversion process by hitting the right-bottom "Convert" button to convert FLAC, OGG, WMA to play on iTunes.

Sync WMA, FLAC, OGG file to iTunes:

1. Download iTunes online, install it on your Mac/PC and run it.
For Windows users:

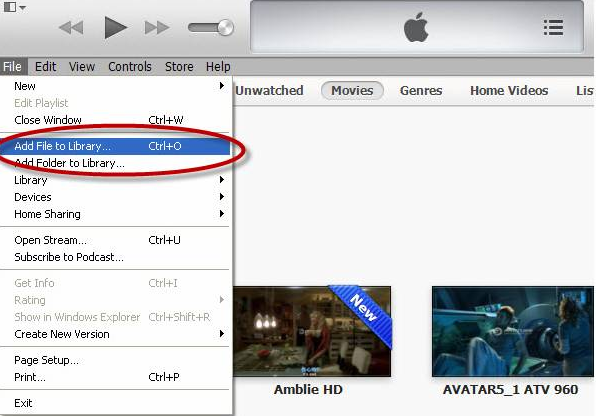
Click “File” on the top menu to follow “Add File to Library” or “Add Folder to Library”.


For Mac users:

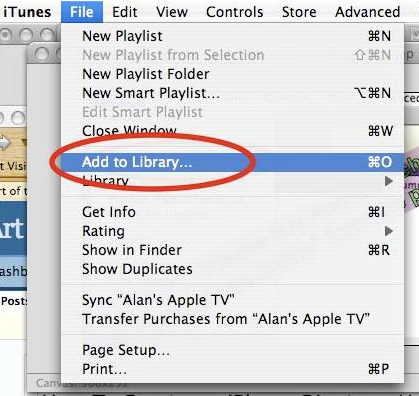
Click “File” on the top menu to follow “Add File to Library” on the iTunes’ main interface, and select the music, video or folder that you  want to add.


2. Choose the file or folder you want to add.
If your iTunes is set to “Copy files to the iTunes Music folder when adding to library”, it will copy all file content to the iTunes Music folder. If you want to change this setting, please go to the “Advanced” tab for adjustment.

With the simply three steps, you can achieve the goal to play WMA, OGG, FLAC in iTunes. Just try!

Related Article:
Wednesday, July 29, 2015

How to Save ISO into MPEG-2 for Raid/Shed?

Many people don’t know how to save ISO to MPEG-2 for Raid and Shed, so they ask in the forum: “I am making Blu-ray family Slideshows. I have some ISO file and I want to change it to MPEG 2 or MP4, then ripping to 1080P, which could be up to 20GB for some larger shows. So I will put them into my Raid or Shed. Now I come cross a problem. I google ISO Converter and find there are too many choices, so which one do you guys often use? Can some one give me some suggestion?”

There are indeed too many ISO Converters on google search as the question feedback. That causes many people don’t know how to choose. Here, I recommend you a top one which can perfectly deal with the problem of the questioner. Pavtube BDMagic is the one I want to introduce to you. It can convert ISO to MPEG-2 or MP4 for Raid/Shed with high resolution and ultra fast speed. Not just MPEG-2 and MP4, it also offer other formats like AVI, WMX, ASF, SWF, etc that Office Presentation supports to Shed and Raid. In its built-in video editing tool, you can trim video footage, crop black area to more fit in your slideshows.

Hot search: ISO to iTunes | ISO to Nvidia 3D Vision ISO to WD TV 

In google research, BDMagic not only is a top ISO Converter, it is actually also a excellent DVD/Blu-ray ripper, which can rip Blu-ray, DVD, VOB, DVD IFO to any other formats like M3U8, H.265, MP4, MOV, M4V, MKV, FLV... In profile settings, you can adjust audio/video codec, size, bitrate and other parameters to get higher video quality.(BDMagicReview)

Mac users click here: BDMagic for Mac.

Free download and install: 
          

Other Download:
- Pavtube old official address: http://www.pavtube.cn/blu-ray-ripper/
- Cnet Download: http://download.cnet.com/Pavtube-BDMagic/3000-7970_4-75922877.html

How to save ISO into MPEG-2/MP4 for Raid/Shed?

Step 1: Load ISO image files

From "File" drop-down menu, select "Load IFO/ISO" to add source ISO image files to the program for conversion.


Step 2: Select output format.

Click "Format" drop-down list, you can see MPEG-2 Video(*mpg). We choose ti as the output format because MPEG-2 file is the video file comprising only the main title of ISO movie without any change in audio/video effect. Therefore, after copying ISO to MPEG-2 (.mpg) video file, the video content is compact and the video effect is as perfect as the original one.


Step 3: Customize output profile parameters.(Optional)

Click "Settings" to open "Profile Settings" window, here you can adjust video codec, size, bitrate, frame rate and audio codec, sample rate, bit rate and channels according to your own preference.


Step 4:Copy ISO to Raid and Shed

Start to convert ISO to MPEG-2 format conversion process by hitting the right bottom convert button.

After backed up ISO to MPEG-2, you can save converted ISO to Raid/Shed then link them with your Slideshows.

Related Article:
Monday, July 27, 2015

Remove Audio from Video in MP4, MKV, AVI, MOV, WMV

Many people are skilled in dealing with video editing. But when it comes to audio, they have no idea. For example, someone record a video clip and want to remove the original audio so that he can replace it with background music; or some people just want to remove the audio track from their movie. When people come across this situation, many of them don’t know how to do it. there are very few applications on the market available to remove audio from all kinds of video like MP4, MKV, AVI, MOV, WMV. But, in this article, you will be introduced a ingenious audio remover which can easily remove audio from video in MP4, MKV, AVI, MOV, WMV. 

This audio remover I want to introduce is Pavtube Video Converter Ultimate. Pavtube Video Converter Ultimate can remove audio from all kinds of video formats including MP4, AVI, DivX, Xvid, WMV, WTV, MOV, MKV, FLV, WebM, OGV, MVI, etc. It removes audio or audio tracks from video as well as keep the same video format and video quality. That is remove audio without encoding and conversion. It also can change one audio format to another audio such as MP3, M4A, AAC, FLAC, WAV, etc.  It supports Windows 10/8.1/8/7 so you can operate audio removal process on the newest Windows system. 

Besides Audio Remover, it also is a Blu-ray Ripper + DVD Ripper + Video Converter + Video Editor. It can deal with all kinds of video, like Blu-ray/DVD moves, TV Shows, Music Drama and Camcorder video to H.265, M3U8, MP4, AVI, MOV, M4V... And it also enables you to trim, crop , and edit video in built-in video editing tool. (Learn more functions inReview)

Free download and install
          

Other Download:
- Pavtube old official address: http://www.pavtube.cn/blu-ray-video-converter-ultimate/
- Cnet Download: http://download.cnet.com/Pavtube-Video-Converter-Ultimate/3000-2194_4-75938564.html

How to remove audio from MP4, MKV, AVI, MOV, WMV video with Audio Remover?

Step 1: Add sources video to the software.

From "File" drop down menu, click the "File" icon to load source video movies from your local computer to the program.


Step 2: Define output file format.

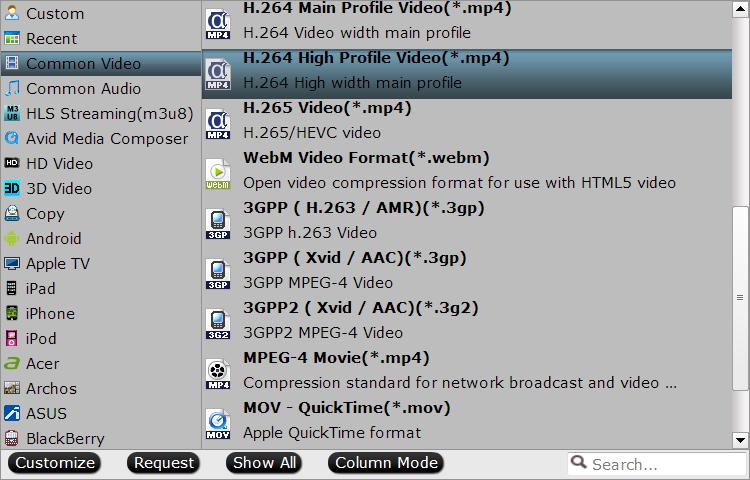
Click "Format" icon, and select what video format you want. Here, we choose "H.264 High Profile Video(*.mp4)" as the output file format from its drop-down options.


Step 3: Remove audio

Click “Edit” icon on the top menu, when video editor windows pop up, you can see “Audio Editor” choice, click ‘Enable’ and tick “Audio Remove” to remove audio from video.


Tip: Tick “Audio Replace”, you can replace the original audio of the video.

Step 4: Start remove audio from video

Press the right-bottom "Convert" button, you will start remove audio from MP4, AVI, MKV, M4V, MOV video process.

When the process is completed, it means that you have removed audio from video. Now, you can deal with this video as you want.

Related Article:
Friday, July 24, 2015

Add SRT/ASS/SSA Subtitles to Movie for Better Movie Enjoyment

In the age of Big Data, people can download movies from whatever movie site, freely or paid. When it must cost normal $10 and more to watch a newly released movie at the cinema, people prefer to pay a little to download it one month later from some special movie site. Not just for the less money, but the comfortable. Image that, you and your friends sit in the sofa, each holding a bucket popcorn, watch the new film on computer. When you see the wonderful plot, you even can discuss with your friends no worry about making others feel noisy. 


And still image that, the movie you download is a foreign film and no subtitle, what dazed! But it is a so common thing. For many reasons, the new released movies downloaded from web site will have no your mother tongue subtitle, which down your movie enjoyment. How to make amends for this disappointment? Go to cinema? NO! You just need to add the right subtitles to the movies on your own. Many subtitle sites update their source so fast though the movie is newly released such as MovieSubtitles.org, OpenSubitles.org and AllSubs.org. You can download the right subtitle from these site and use Pavtube Video Converter Ultimate to add the subtitle into your movie. 

Pavtube Video Converter Ultimate is a professional video software. With it, you can easily add external SRT/ASS/SSA subtitles to movie and videos. Not only to the movie you downloaded from the site, it also can add subtitles to your copy protected Blu-ray/DVD movies and regular 4K/HD/SD videos. Of course, as a professional video software, its function will not limited to just add subtitles to movies. It can convert 2D/3D Blu-ray/DVD and 4K/HD/SD videos to any other popular video formats. And it also is a video editor. With it, you can trim video footage, crop black area, add watermark and other functions. You even can adjust video and audio size, bitrate, etc to change the size and quality of video. If you are interested in its more functions, read its review.

In addition, this tutorial is based on Windows, if you are a Mac user, please refer to this article: How to add subtitles to videos on Mac?

If you don’t have a Pavtube Video Converter Ultimate , download in the following:

Free download and install
          

Other Download:
- Pavtube old official address: http://www.pavtube.cn/blu-ray-video-converter-ultimate/
- Cnet Download: http://download.cnet.com/Pavtube-Video-Converter-Ultimate/3000-2194_4-75938564.html

Add subtitles to movies for better movie enjoyment

Step 1: Load movies to the software 

Click “File” menu, and select "Add Video/Audio" to import source movies.


Step 2: Set video format

If you don’t need to change your movie format, you can by default choose the original format in “Format” bar. There are many formats here to meet all your devices’ requirement. 

Step 3: Add subtitle to movies

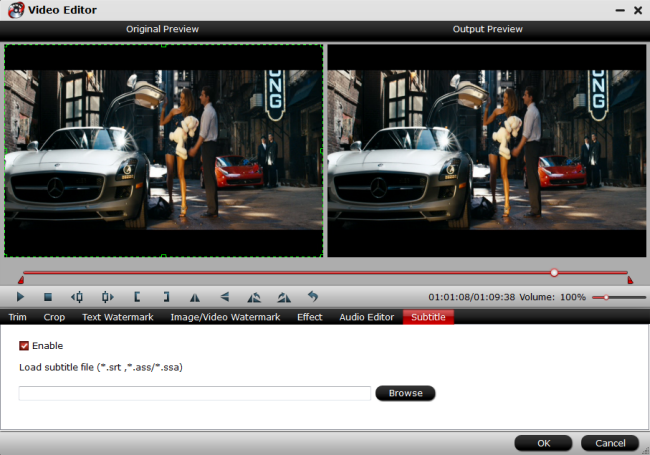
Click the “Edit” icon on the tool bar of main interface. On the “Video Editor” Window, you can play and preview the original video and output effects. Click “Subtitle” icon. In this tab, you can add SRT/ASS/SSA subtitle files to the movie as hard subtitles. Tick “Enable” and click “Browse”. Choose your subtitle file on your computer. 


Note: Please make sure that the names of the movies and the subtitle file are matched. For instance, if the movie file is saved as "Jurassic World.mp4" , you must ensure the name of the subtitle file to be saved in "Jurassic World.srt", "Jurassic World.ssa" or "Jurassic World.ass".

Step 4: Start converting
 
Before start converting, you can preview the video on the preview window. Then click “Convert” to start adding subtitles to movies.

Now, you will succeed to add subtitles to your movie. You can watch the film with your friend with better enjoyment. 

Related Article:
Wednesday, July 22, 2015

Copy Blu-ray to M2TS for External Hard Drive

To protect optical drive from excessive usage and prevent scratch of expensive physical Blu-ray disc from playback, the Blu-ray disc owners tend to extract M2TS file from Blu-ray disc to external hard drive. Rather than the time-consuming process of ripping your Blu-ray movie to a high definition video format (H.265M3U8AVIMP4MOVMKV, H.264...) to make a digital copy of Blu-ray disc on your computer, copying the whole Blu-ray disc into the original M2TS file will actually save you a lot of time. And putting the M2TS file to external hard drive will be convenient for you to store and organize your Blu-ray movies. So that you can enjoy Blu-ray movies without ever having to get off your couch to drop a disc in your Blu-ray player.

The way of copying Blu-ray to M2TS for external hard drive is simply easy. With the help of Pavtube BDMagic, you can 1:1 copy Blu-ray to external hard drive in M2TS, preserving multiple audio streams, subtitle tracks and chapter markers without any quality loss. Moreover, you can get 6X time Blu-ray to M2TS ripping speed with NVIDIA CUDA technology. Of course, if you want all the information of Blu-ray movies like comments, you still can make Blu-ray full disc copy.

If you operate this process on Mac, you need a Directly Blu-ray Copier for Mac. With it, you can backup Blu-ray on Mac OS X El Capitan and Yosemite 10.10/10.9 and Mavericks easily. 

Take Windows system as an instance, the following is a tutorial on copy Blu-ray to external hard drive.

Free download and install: 
          

Other Download:
- Pavtube old official address: http://www.pavtube.cn/blu-ray-ripper/
- Cnet Download: http://download.cnet.com/Pavtube-BDMagic/3000-7970_4-75922877.html

Surprise: click here, you can get up to 50% discount on BDMagic. 

How to Copy Blu-ray to M2TS for external hard drive?

Step 1:  Load the Blu-ray Movie

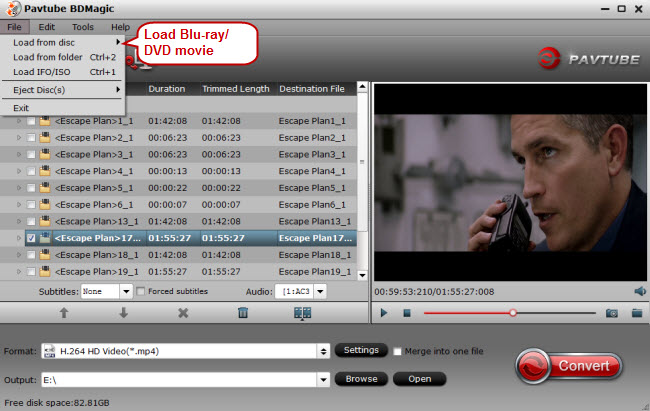
Run your Blu-ray to Hard drive Converter and insert your Blu-ray disc into your Blu-ray drive. Click “file” to find the “ load from disc” choice to import your Blu-ray movie. 


Step 2: Choose the output format and file

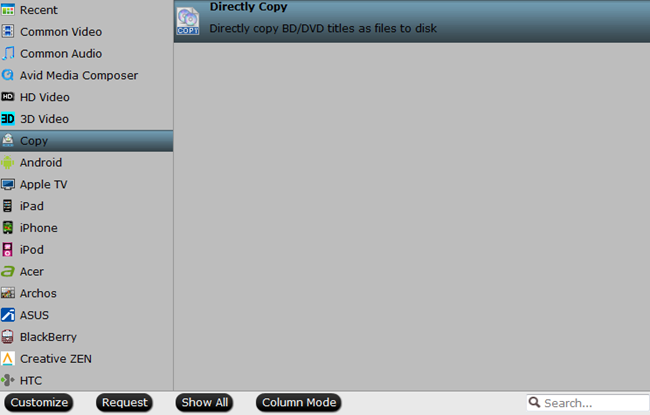
Move mouse down, tap” format” button and there is a bar in which you can hunt the choice of “copy”. Hit it and then “Directly Copy” appears. The next step is to set the output file you want the created video to be saved in . The icon of ”output” will help you accomplish the order.


Step 3: start the copy process

After all your settings, what you need to do in the end is to click the big red “convert” to get the Blu-ray to M2TS copy process started.

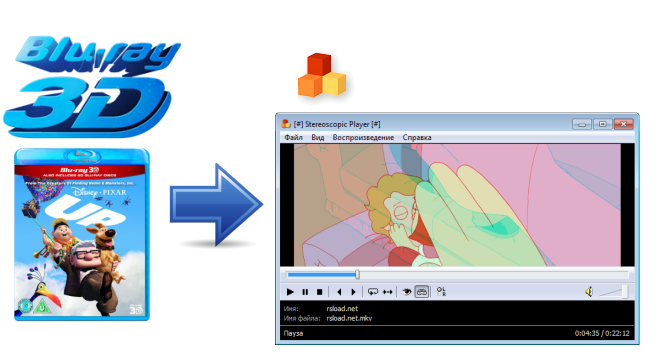
Copying Blu-ray to M2TS provides complete and intact main content. Then you can store M2TS file on external hard drive. In addition, BDMagic still can backup  2D/3D Blu-ray to Stereoscopic PlayeriTunesWindows Media CenterSurface 3Oculus Rift DK2.

Related Articles:

Monday, July 20, 2015

The 5 Best Movies of 2015 So Far

Although the summer blockbuster season is getting underway, 2015 has already offered a wealth of inspiring fare for the cinephile. In the first half of 2015, there are many strong flicks to hit theaters. Now let’s look back the best movies in 2015 so far that you can’t miss. 

1.Jurassic World


Director: Colin Trevorrow
Stars: Chris Pratt, Bryce Dallas Howard, Ty Simpkins, Judy Greer
Plot: A new theme park is built on the original site of Jurassic Park. Everything is going well until the park's newest attraction--a genetically modified giant stealth killing machine--escapes containment and goes on a killing spree.

2. Avengers: Age of Ultron

Director: Joss Whedon
Stars: Robert Downey Jr., Chris Evans, Mark Ruffalo, Chris Hemsworth
Plot: When Tony Stark and Bruce Banner try to jump-start a dormant peacekeeping program called Ultron, things go horribly wrong and it's up to Earth's Mightiest Heroes to stop the villainous Ultron from enacting his terrible plans.

3. Furious Seven

Director: James Wan
Stars: Vin Diesel, Paul Walker, Dwayne Johnson, Jason Statham
Plot: Deckard Shaw seeks revenge against Dominic Toretto and his family for his comatose brother.

4.Mad Max: Fury Road


Director: George Miller
Stars:  Tom Hardy, Charlize Theron, Nicholas Hoult
Plot: In a stark desert landscape where humanity is broken, two rebels just might be able to restore order: Max, a man of action and of few words, and Furiosa, a woman of action who is looking to make it back to her childhood homeland.

5.Inside Out


Director: Pete Docter, Ronaldo Del Carmen
Stars: Amy Poehler, Bill Hader, Lewis Black, Mindy Kaling
Plot: After young Riley is uprooted from her Midwest life and moved to San Francisco, her emotions - Joy, Fear, Anger, Disgust and Sadness - conflict on how best to navigate a new city, house, and school.

All above movies can be regarded as must watch movies in 2015. These 5 best movies deserve to add to your movie collections. Maybe you have bought their Blu-ray/DVD disc to collect. Or you have purchased and download them from Torrent site. If you want to protect the discs and organize your movie collections conveniently, or just put these wonderful movies to iPhone 6/Plus, iPad Air 2/Mini 3, Galaxy S6, PS4PS3 for playing on the go or to Cloud storage,Seagate Wireless Plus, NAS server for sharing, you can copy these movies to other format and devices. Pavtube Video Converter Ultimate can deal with all kinds of videos, like Blu-ray/DVD movies, HD videos, H.265 4K video. It can rip Blu-ray/DVD and transcode these 5 best movies in 2015 so far to your portable devices in compatible format with high video quality.

Free download and install
          

Other Download:
- Pavtube old official address: http://www.pavtube.cn/blu-ray-video-converter-ultimate/
- Cnet Download: http://download.cnet.com/Pavtube-Video-Converter-Ultimate/3000-2194_4-75938564.html

Instruction to convert the 5 best movies with Video Converter Ultimate

Step 1: Load file

When you start up Pavtube Video Converter Ultimate, the main interface pops up. Click “File” menu, and select “Load IFO/ISO”, “Load from folder”, “Load from disc”, "Add Video/Audio" or "Add from folder" to import source files.


Step 2: Set output format

Clicking the Format bar, you can choose output format from the format list or customize which formats to be shown on the list.

Step 3: Start Conversion
Clicking the Convert button on main interface, you can go to Conversion window to start the 5 best movies conversion.

Also, this video software supports to splice audio,add SRT subtitles and edit videos in built-in video editing tool.

With video converter, you can get better enjoyment and storage on the 5 best movie in 2015 so far.

Related Article:
Friday, July 17, 2015

Directly Copy 3D Blu-ray in Original 3D to Stereoscopic Player on Mac

As a versatile 3D movie player, Stereoscopic Player is popular among 3D movie fans. But for enjoying 3D experience with Stereoscopic Player, you must have real stereoscopic movies because Stereoscopic Player officially announces that it can not convert 2D content to 3D lacking conversion algorithm. So many people choose to create 3D movies from 2D Blu-ray, DVD movies on their Mac computer. But what 3D movie source can be better than 3D Blu-ray with high definition and 3D effect at the same time? If you have 3D Blu-ray, you don’t need the complex steps to create 3D movies from 2D movies on Mac, whose 3D effect maybe inferior. You just need to directly copy 3D Blu-ray to Stereoscopic Player on Mac because Stereoscopic Player can read 3D M2TS file. That will be easier than the former way. 


Pavtube BDMagic for Mac help you simplify the process of directly copying 3D Blu-ray to Stereoscopic Player on Mac. It is a professional tool for Mac users to directly copy 3D Blu-ray in 3D effect with simple operations keeping original video quality. It has updated to support Mac newest system OS X El Capitan. So you can copy 3D Blu-ray in 3D effect on Mac OS X El Capitan.

Free download and install:
          

Other Download:
- Pavtube old official address: http://www.pavtube.cn/blu-ray-ripper-mac/
- Cnet Download: http://download.cnet.com/Pavtube-BDMagic/3000-7970_4-76177782.html

How to directly copy 3D Blu-ray to Stereoscopic Player in 3D effect?

Step 1: Load 3D Blu-ray to the program.

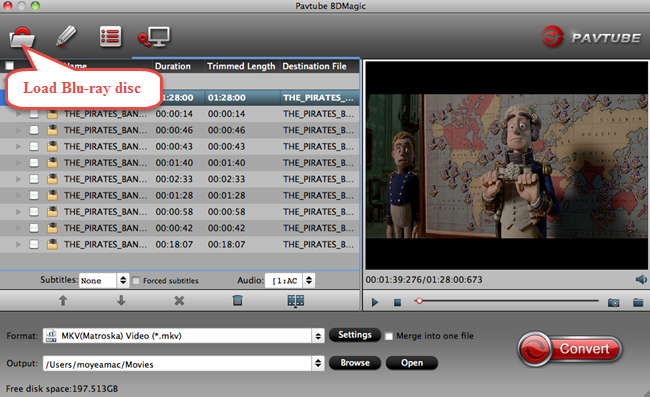
Select "Load from disc/folder" from the "File" menu drop-down list to add 3D Blu-ray movies to the program on Mac.


Step 2: Directly copy 3D Blu-ray

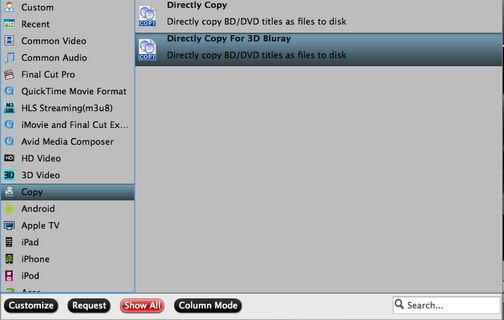
Move mouse down, tap” format” button and there is a bar in which you can hunt the choice of “copy”. There are two choices in “Copy”, just choose “Directly Copy For 3D Blu-ray” to copy your 3D Blu-ray on Mac.


Step 3: start the copy process

After all your settings, what you need to do in the end is to click the big red “convert” to get the copy process started.

Directly copying 3D Blu-ray to Stereoscopic Player on Mac is very easy with BDMagic for Mac  just needing three steps. And this 3D effect will be better. Now, enjoy your 3D Blu-ray movie on Stereoscopic Player.

Related Article:
Wednesday, July 15, 2015

Sync iTunes Movies to Plex for Viewing

Have purchased and stored many movies on iTunes? And got tired of its limited playback on non-Apple ecosystem portable devices on the go or at home? There is simple way to play iTunes movies on non-iOS devices. That is to remove iTunes movies DRM protection and transfer them to Plex Media Server. Plex allows you to store all your movies on a central server and watch them on your PS4, Xbox One, Apple TV or smart phones based Mac and Windows system both home and away. Plex supports many kinds of formats like MP4, MOV, AVI, MPEG video files, MP3, WMA audio files, and etc but not iTunes M4V format. So syncing iTunes movies to Plex for better entertainment, you should transcode iTunes M4V video to Plex playback video in advance.

Hot search: sync iTunes movies to Galaxy Note 4Android devicesChromecastGalaxy S6/S6 EdgePS Vita.

Top DRM Removals are just the key to sync iTunes movies to Plex. They can simple remove the DRM protection of iTunes movies, which prevents you from copying and transferring iTunes movies to other devices or programs, including Plex for playing. One of these top DRM Removals is Pavtube ChewTune. ChewTune enables you to get rid of DRM protection from iTunes videos  to Plex supported formats at fast speed without quality loss.  It also can remove DRM protection from WMV videos like Amazon, BBC iPlayer and BD/DVD "Digital Copy" protection.(Review)

Free download and install:
     

Other download:
Pavtube Old Site Download: http://pavtube-chewtune.software.informer.com/

How to sync iTunes movies to Plex with DRM Removal?

Step 1. Load iTunes Movie to app

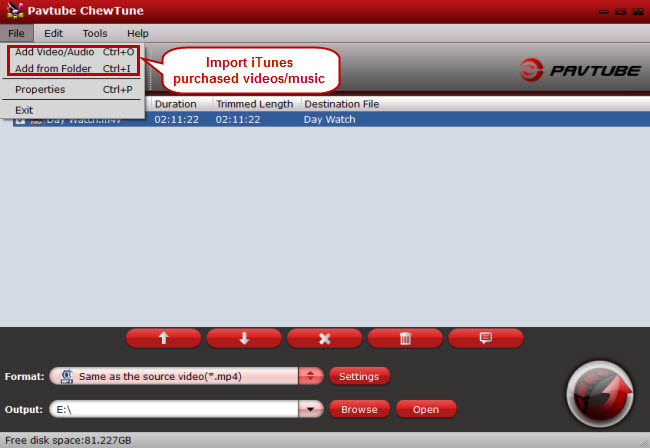
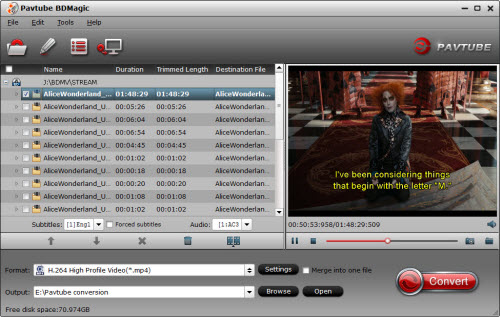
Add video to this iTunes DRM remover and recorder. Drag and drop your videos to it directly, or you can click "File" to load videos as showed blow.


Step 2. Select Output Format

Click the drop-down-list besides "Format" and choose "Common Video > H.264 Video(*.mp4)" as the most compatible format for Fire TV.


Tip: Click "Settings" button to enter Profile Settings window, you can adjust video size, codec, bitrate and frame rate and some other audio parameters here.

Step 3. Start conversion.

The last step, hit the big red icon to start converting DRM iTunes videos to Plex. This iTunes to Plex Converter will automatically start to convert. After conversion, click "Open output folder" to quick locate the converted video 

Transfer DRM-free iTunes movies to Plex Media Server

1.Download Plex on Windows.
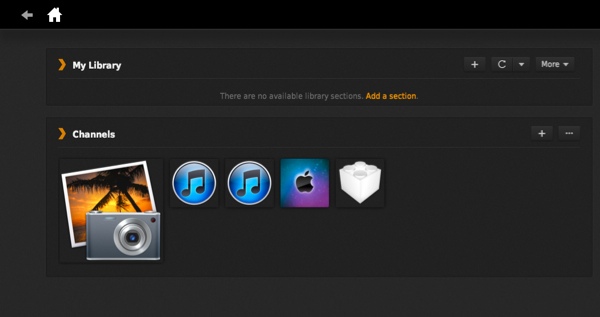
2.To launch the Plex Server interface, right click on the arrow icon and click on "Media Manager." This should open Plex in your default browser, and you should see this screen:


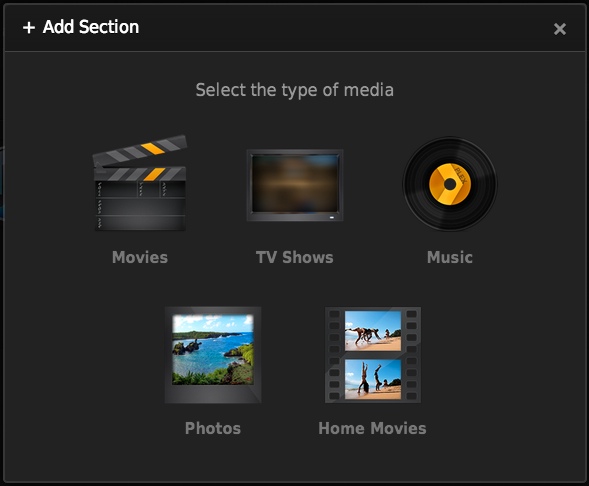
3.Click on the "Add a section" link in My Library. A popup will ask you if you want to add movies, TV shows, music or photos. Select the type of media you want to add.


4.Once you've selected the type of media, you'll have to point Plex to the folder(s) where your iTunes movies are stored.
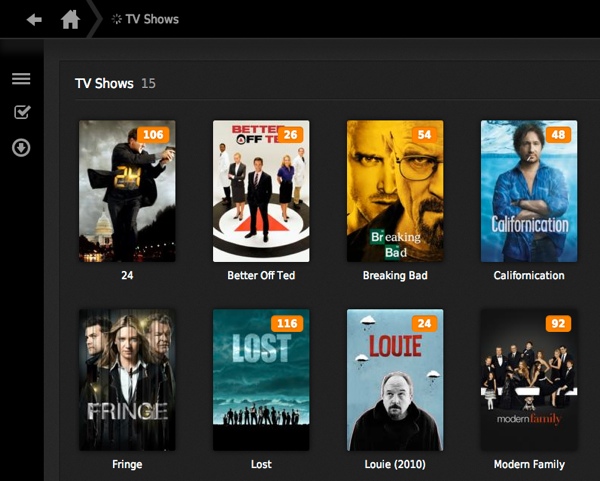
5.Add all the locations on your disk where you think you have your videos stored, and hit save. Once you click save, Plex should automatically start scanning your media and fetching artwork and other associated metadata from the internet.


That’s all to sync iTunes movies to Plex, is it easy? Then, you can enjoy your iTunes video on Plex via Xbox OneSony Bravia TVPS4Amazon Fire TV, etc.

Related Article:
Monday, July 13, 2015

How to Play Blu-ray on PS3 with AC3 5.1 Audio?

PS3 is more than a game console. People tends to enjoy HD movies on PS3 connecting with HD TV. But as the leader of HD video, Blu-ray seems not to be easy to streamed on PS3. People continually meet various problems during Blu-ray playback on PS3. Something like these: a message pops out: OUT OF RANGE 28.1 khz / 25 hz when you try to open a Blu-ray film;  you just output a resolution higher than your TV can display; or your PS3 can’t play a Blu-ray movie with WAV audio. In short, various problems lead to the failure Blu-ray playback on PS3. Is there a One Right Way to play Blu-ray on PS3 with AC3 5.1 audio smoothly with ease?  

Pavtube BDMagic won’t let you down! This professional Blu-ray to PS3 converter can rip and backup Blu-ray to PS3 supported formats with AC3 5.1 audio like H.264/MPEG-4 AVC, easily and rapidly. It can preserve nearly the original video quality. Moreover, in its setting choice, you can adjust video codec, size, bitrate to achieve the video which is more compatible with PS3. More features you want to know about BDMagic, just read Pavtube BDMagic Review

Free download and install: 
          

Other Download:
- Pavtube old official address: http://www.pavtube.cn/blu-ray-ripper/
- Cnet Download: http://download.cnet.com/Pavtube-BDMagic/3000-7970_4-75922877.html

How to play Blu-ray movies on PS3 with AC3 5.1 audio?

Step 1. Load Blu-ray to the program.

Click "File", from its drop-down list, select "Load from disc" to import Blu-ray disc to the software for conversion.


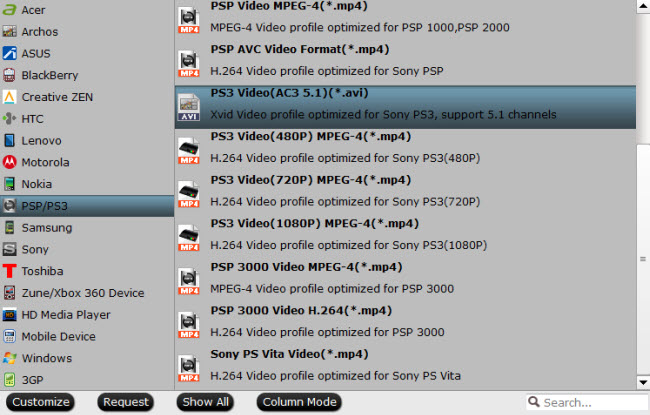
Step 2. Choose PS3 supported playback format

Click the format bar and you’ll be shown with an output format list where you need to follow “PSP/PS3” > “PS3 Video (AC3 5.1) (*.avi)” and you’ll get an AVI file with AC3 5.1 audio, which is fully supported by PS3.


Step 3. Convert Blu-ray to PS3 

In bottom right screen of main UI, click on the “Convert” button to start converting Blu-ray to PS3 with AC3 5.1 audio. Locate created movies in output folder when the conversion process is finished. 

Stream ripped Blu-ray movies on PS3 with AC3 5.1 audio

To realize streaming Blu-ray on PS3, you’ll need an app called PS3 Media Server.

Before streaming videos to PS3, you need to setup your PS3. Make sure your PS3 is connected to the same network (via either Ethernet or wireless) as your computer. Check the connection by going to “Settings” > “Network Settings” >“Media Server Connection” on your PS3 and set it to"Enabled" otherwise the streaming work will not work.

1. Download PS3 Media Server and launch it on your PC.
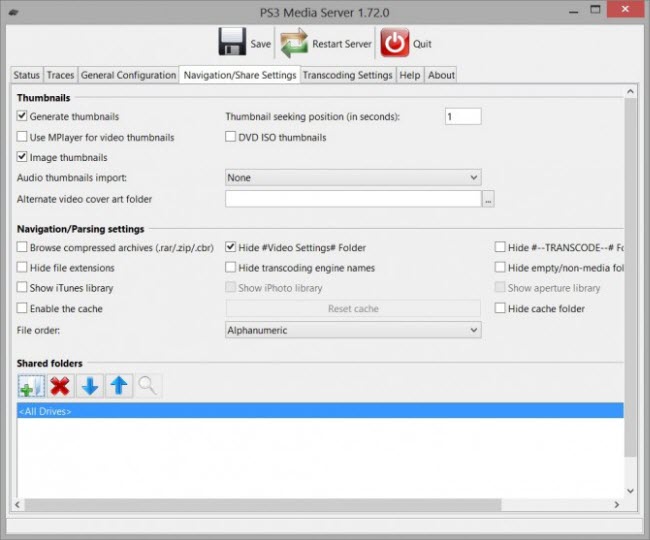
2. Click the “Navigation/Share Settings” tab on main UI of PS3 Media Server.


3. In bottom left screen, find the “Shared folders” section where you need to remove .
4. Click the green plus icon to add the folder where you keep the ripped Blu-ray file.
5. Then the ripped Blu-ray files with AC3 5.1 audio will show in your PS3.

Just few steps, you can play Blu-ray on PS3 with AC3 5.1 audio with BDMagic. And you don’t worry failure playback any more.

Related Article:
Friday, July 10, 2015

How to Watch Blu-ray Movies on QuickTime on Mac OS X El Capitan?

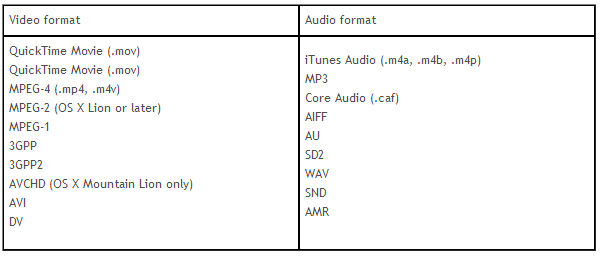
What is the first media player on Mac OS X El Capitan? Quicktime will be the one. Not because it is bundled with Mac OS X, just in that it's powerful media technology that works on Mac OS X El Capitan with just about every popular video or audio format you come across. Its playable audio and video formats just like the same sheet:


Although QuickTime supports many video formats, as we all seen, Blu-ray is not in the list. So if you have many Blu-ray movies, no matter from your paid Blu-ray discs or downloaded from internet, how do you watch Blu-ray movies on QuickTime Mac OS X El Capitan?

Pavtube BDMagic for Mac is exactly designed for this problem. This Blu-ray to QuickTime converter enables you to rip and backup Blu-ray to QuickTime playable formats at ultra fast time with high video quality. What’s more, it is updated to support the Mac OS X El Capitan and Yosemite 10.10. So you can rip Blu-ray on your Mac OS X El Capitanand Mac Yosemite 10.10/10.9. It also can play Blu-ray movies of region A, region B and region C


Free download and install:
          

Other Download:
- Pavtube old official address: http://www.pavtube.cn/blu-ray-ripper-mac/
- Cnet Download: http://download.cnet.com/Pavtube-BDMagic/3000-7970_4-76177782.html

How to rip Blu-ray to QuickTime playable format?

Step 1: Load Blu-ray movies

Click the "Folder" icon on the top menu bar to load your Blu-ray disc to the program


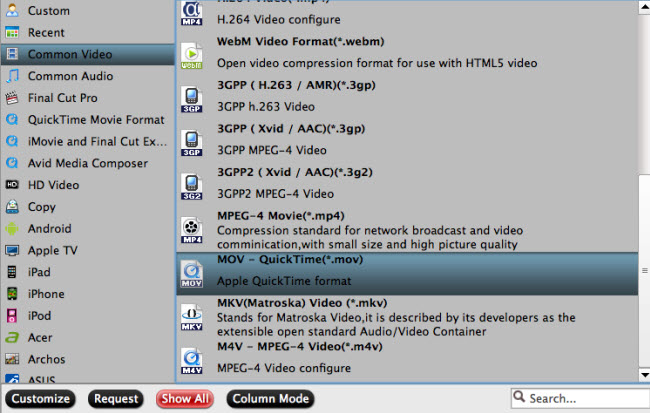
Step 2: Choose QuickTime MOV format

Click "Format" bar, from its drop-down selection, define "MOV-QuickTime (*.mov)" as the output profile format.


Step 3: Start to rip Blu-ray to QuickTime

Start to rip Blu-ray to QuickTime format process on OS X El Capitan by hitting the right-bottom conversion button. When the conversion is done, locate the ripped Blu-ray in the output folder.

Now, you can freely enjoy your Blu-ray movies on QuickTime on Mac OS X El Capitan.