“I have a large DVD/Bluray Collection and want it digital so my grandchildren and kids do not damage the originals. I want to rip these Blu-ray/DVD disc to my personal cloud storage. I bought a personal cloud device. Seagate but I have also used Western Digital (My Cloud) ... Ipads, PCs, Mac, Android can all access them and view without trouble.”
If you also have the idea on digital your Blu-ray/DVD collection, ripping the Blu-ray/DVD disc to personal cloud storage must be the best idea. Since it not only can protect your original Blu-ray/DVD disc, but also give the access to your various multimedia players like iPad, iPhone, PC, Mac, Android Phones, Tablets to view Blu-ray/DVD movies directly without any troubles.
Here, I would introduce Pavtube BDMagic to help you digital Blu-ray/DVD to personal cloud including Seagate Wireless Plus, Western Digital MyCloud in suitable video format, such as MP4. Of course, if you want H.265, M3U8, MKV, MOV, AVI, FLV and any other popular format, it also can give you.
If you just want to store your Blu-ray/DVD movies to personal cloud storage to view in just one kind portable media players, like iPad, Apple TV, iPhone 6, it can offer you the best preset for you which you don’t need to adjust the video and audio parameters on your own. (Learn more in its review.)
Free download and install:


Other Download:
- Pavtube old official address: http://www.pavtube.cn/blu-ray-ripper/
- Cnet Download: http://download.cnet.com/Pavtube-BDMagic/3000-7970_4-75922877.html
How to Digital Blu-ray/DVD Collection to Personal Cloud Storage?
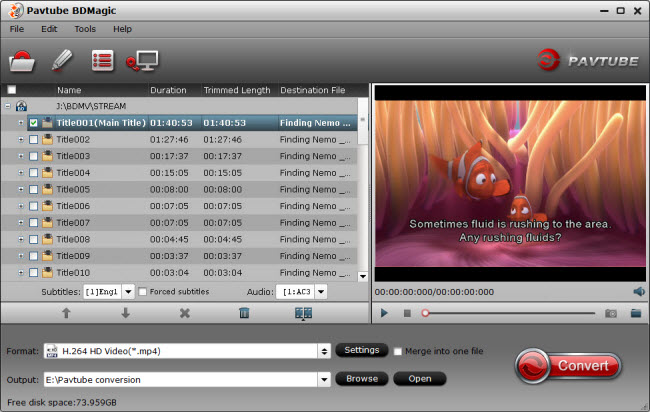
Step 1: Load Blu-ray/DVD movie
Click “File” to load your Blu-ray/DVD movie to this program. It will automatically choose the main content to convert. If there are several language subtitles in your Blu-ray/DVD movies, you can select the language subtitle you want to show in your movie by “Subtitle”.
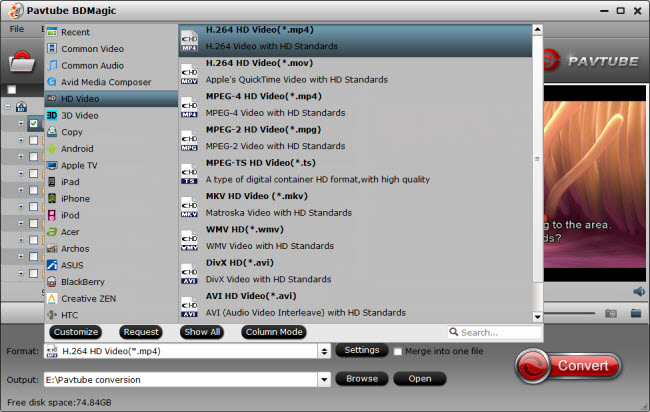
Step 2: Specify output format
In drop-down format list, you can choose “HD Video” > “H.264 HD Video(*.mp4)” as output format for nearly all laptops, tablets, mobile phones can play MP4 videos.
Learn Also: Rip 300 DVD Collection to External Drive for Dell/Lenovo/Toshiba Laptops
Tip: If you just want to digital your Blu-ray/DVD for more convenient organization and management, you also can choose to full disc copy Blu-ray/DVD or main title copy.
Step 3: Start backup Blu-ray/DVD to MP4
After all settings done, hit on the “Convert” button and Blu-ray/DVD to H.264 MP4 for personal cloud storage conversion will start. After the conversion completes, open output folder and you will find the converted movies.
Now, the Blu-ray/DVD digitalize ends. You can move them to your personal cloud storage and play them on your various mobile multimedia players.
Supplement: Move Video, Music and Files to Seagate Wireless Plus
Please follow this procedure to load content wirelessly onto your Wireless Plus device in Windows using SAMBA. The device must be connected to your computer via WiFi before proceeding:
1.Power on the Wireless Plus device.
2. Locate the Wireless Plus device in your wireless access menu.
3. Select the Wireless Plus device and enter a password if you have set one up.
4. Double-click on (My) Computer.
(Windows 8: Press the Windows key () + D, then select File Explorer (.)
5. Select Map Network Drive.
6. In the Folder field, type:
\\172.25.0.1\Public. You can also change the default drive letter to a letter of your choice, as long as that letter is not already taken by a different device. The drive is now listed in (My) Computer and Windows/File Explorer:
7. Drag and drop or copy and paste your media files to the drive.
Please note that transferring large files or many files wirelessly may result in low performance. If you are moving large files or many files to the drive, Seagate recommends you connect to the computer using the USB cable instead.
Related Articles:
No comments:
Post a Comment