Wednesday, July 8, 2015

How to Import ISO files to iTunes for Syncing to iOS Devices?

Do you have many ISO files from Blu-ray/DVD discs, paid website or just you made by yourself? With the number of ISO files increasing, do you feel like that you are getting unsatisfied because you just can enjoy your ISO file by virtual ISO drive? If so, importing your ISO files to iTunes maybe a good idea, which can sync the ISO files to Apple devices in order to ISO playback anytime and anywhere. But as we all known, iTunes just supports MOV, M4V and MP4 videos so it can’t play ISO file directly. So what should we do to import ISO files to iTunes for syncing to iOS devices? Actually, it is just a little thing we need to do, that is backup ISO to iTunes supported formats


Here Pavtube BDMagic can fulfill the need to rip ISO file to iTunes playable formats. This ISO to iTunes software can convert ISO to MP4,M4V and MOV that iTunes supports with fast speed and high quality. Besides ISO file, it also enables you to rip Blu-rayDVD to iTunes video directly and other regular video and audio formats like M3U8H.265, AVI, WMV, FLV, MKV etc.

Free download and install:
          

Other Download:
- Pavtube old official address: http://www.pavtube.cn/blu-ray-ripper/
- Cnet Download: http://download.cnet.com/Pavtube-BDMagic/3000-7970_4-75922877.html

How to rip ISO to iTunes suitable formats?

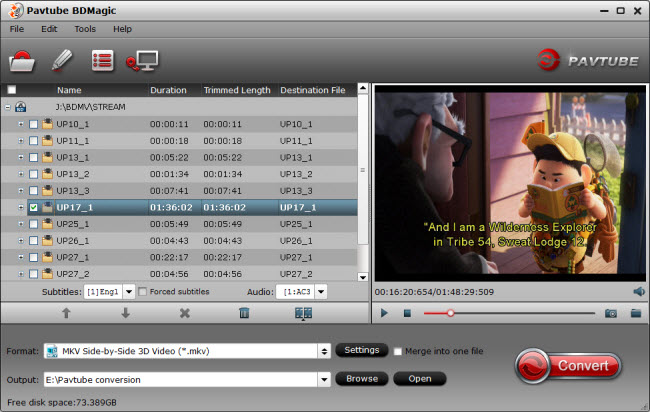
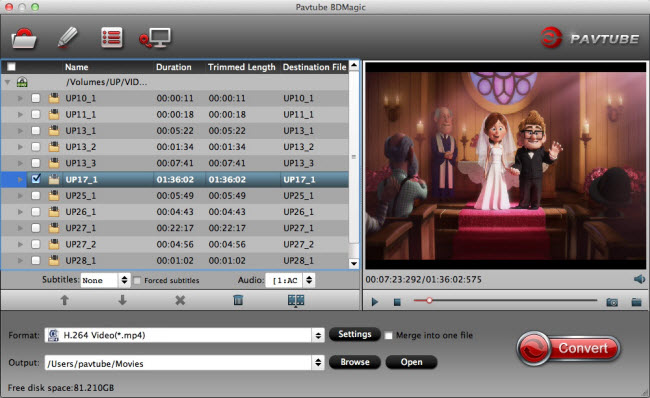
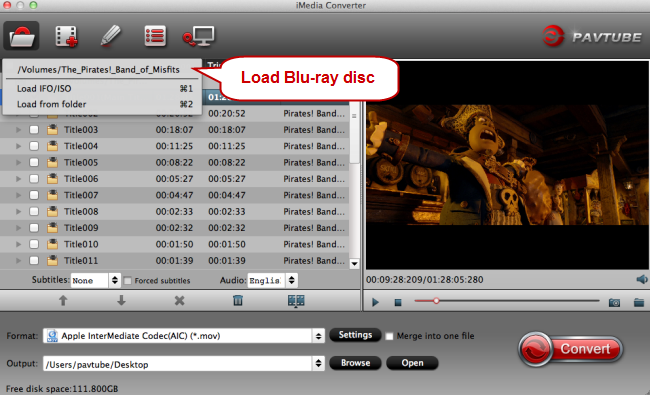
Step 1: Add ISO file to the software

From "File" drop-down menu, select "Load IFO/ISO" to add source ISO image files to the program for conversion.


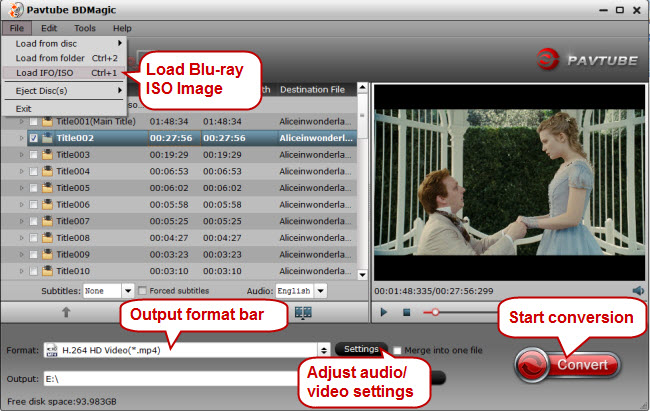
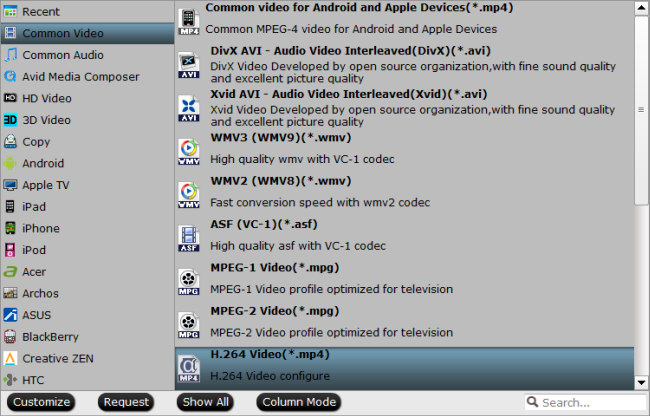
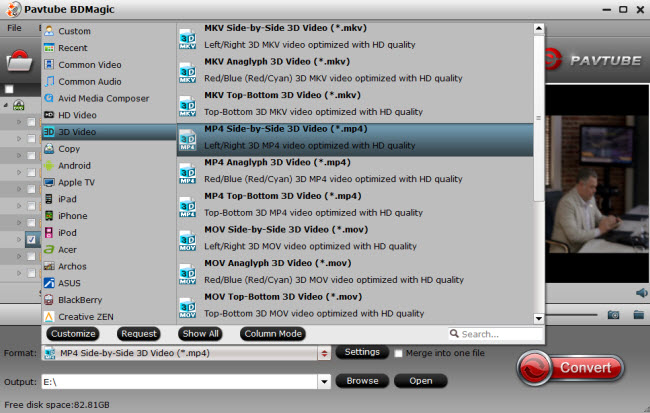
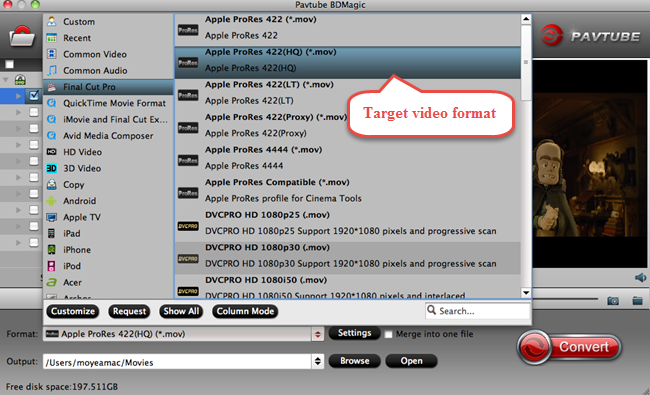
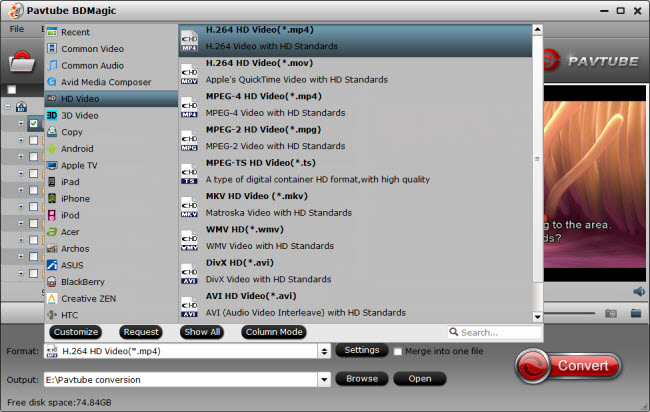
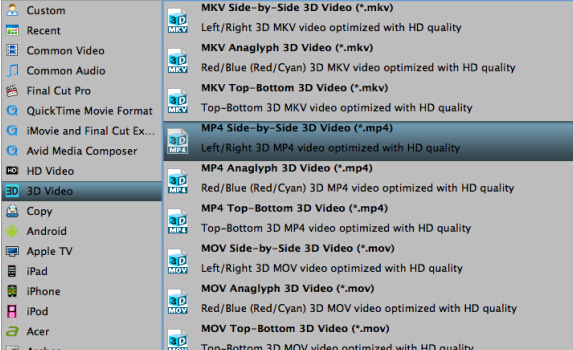
Step 2: Choose output format

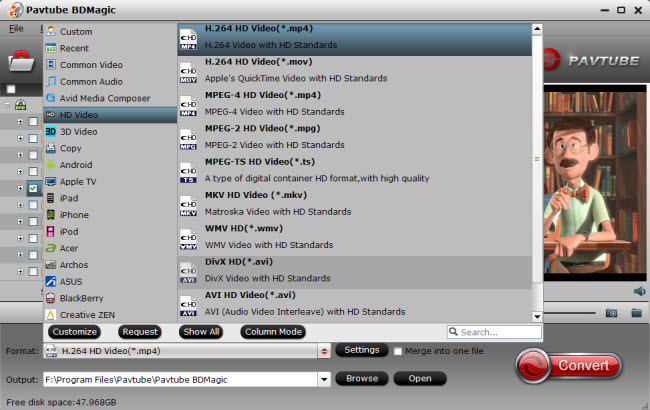
Click the format bar to follow “HD Video” > “H.264 HD Video (*.mp4)” as output format. This ISO to iTunes converter provides rich output audio/video formats suitable for Apple devices.


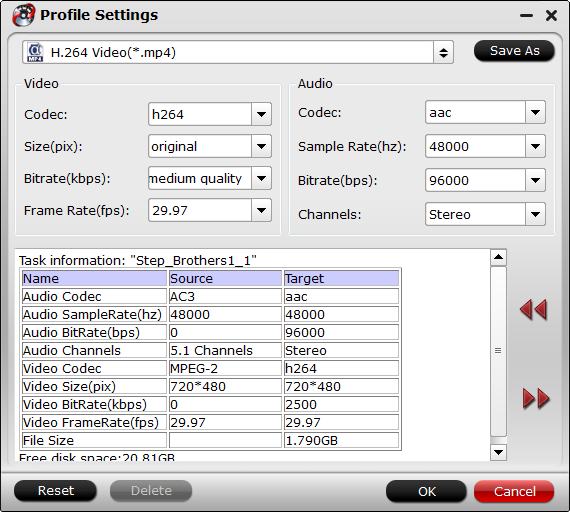
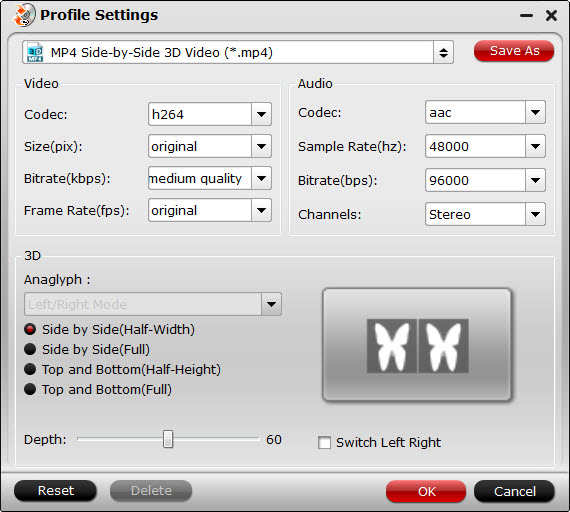
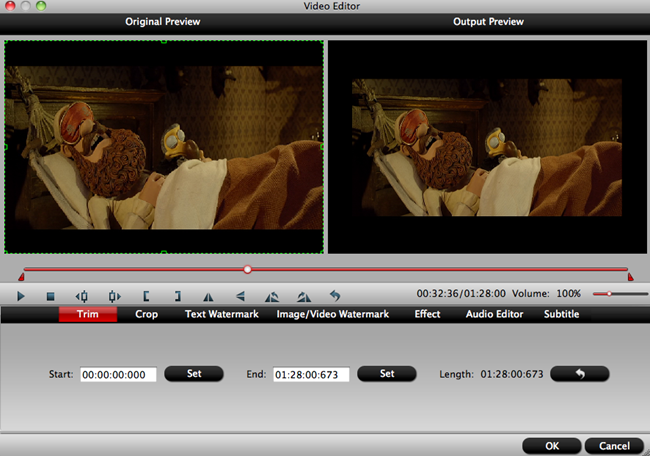
Step 3:  Customize profile presets (optional)

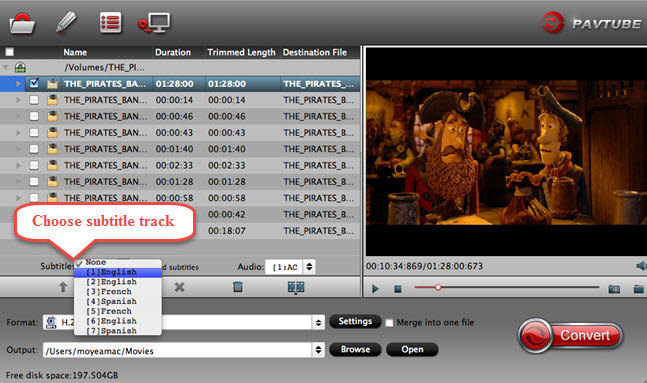
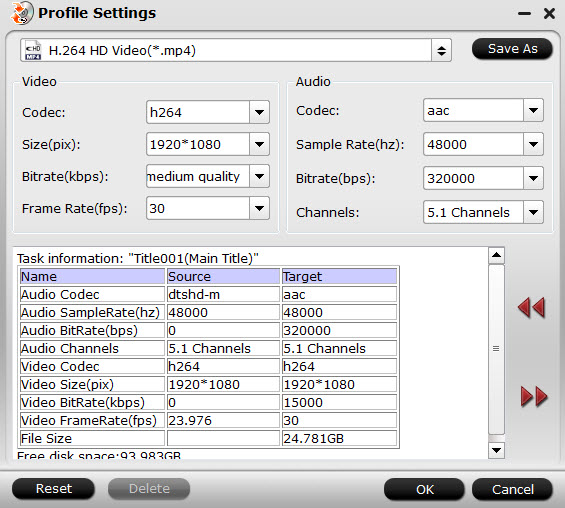
Free to adjust video and audio parameters in "Profile Settings" in order to achieve better movie enjoyment on different devices. You could set video codec, video size, bitrate, frame rate, and more presets so as to extend ISO file experience.


Step 4: Start to rip ISO to iTunes process

When finishing the above three steps, just click the button “Convert” which is on bottom-right corner to start conversion from ISO file to iTunes conversion process.

After conversion, you can sync your ripped ISO file to iTunes for playback. Then for better entertainment, you still can sync your iTunes to iPhoneiPad so that you can enjoy ISO image anywhere you want.

Related Articles:

Monday, July 6, 2015

How to stream Local Video to Chromecast and Watch on TV?

Google Chromecast, a thumb-sized, inexpensive yet simple streaming device, can let you enjoy numerous movies on your Smart TV online. It enables you to stream multiple video formats on your television, especially HDTV, MP4, MPEG-DASH. With these formats, you can smoothly stream local video via Chromecast on a big screen. But for TS, M2TS, DivX and other formats video of your local movie library which Chromecast doesn’t support, you may need to search for another method. So later, I will share my experience about how to stream local video (supported & unsupported) to Chromecast and watch on TV for those searching for the ways.

Hot Search: Google Chromecast Common Issues and Solutions | Ten Creative ways to enhance your streaming experience via Chromecast 

How to stream supported local video to Chromecast and watch on TV?

Actually, you can use Chrome browser to stream local video to Chromecast. Any videos that can be played on your PC can be played on your TV now. With this method, You do not need any apps except the Google Cast extension for Chrome. For Google Cast extension, you can set the quality to  High (720p) or  Extreme (720p high bitrate) to get a reasonable video quality on a full HD TV.

Step 1:  Install and configure Google Cast extension

In Chrome webstore, You can find the official Google cast extension. Download and install the free one as shown below.


Then, you will get a confirmation page. It tells you the permission this extension is seeking. As it is from Google, you can trust it. So, click “Add” as shown below to add this official Google cast extension to your Chrome browser.


Step 2: Set video quality

To set the video quality, you may click the Google cast extension as shown below. Then click Options to choose the suitable tab casting quality. You can set the quality to High (720p) or Extreme (720p high bitrate) to get a reasonable video quality on a full HD TV. If your network connection is not good, or your video is in 480p, you can choose 480p.


Step 3: Fill the location of the video to the address bar in Chromecast

In the address bar, instead of typing a web address, now you type the video file address like (without quotation marks) “file://c:/yourvideo.mp4”. Of course, you need locate your video file and give the full path to it. Once Chrome is playing the video, you can then click the Google cast extension and choose the Chromecast devices as shown below. The video will then be shown on TV.


That’s all. This is the simplest way to stream local video to Chromecast without using any apps. Of course, there is one downside: the streaming quality is limited to 720p with high bitrate, no 1080p at this time. But this quality usually is sufficient for most videos. And then, for these unsupported local video, what should we do to stream them to Chromecast? The following is the way. (How to setup and use Chromecast to stream your content to TV?)

How to stream unsupported local video to Chromecast and watch on TV?

Actually, Chromecast unsupported video formats includes M2TS, 3GP, DIVX, RM, RMVB, ASF, TS, DV, F4V, OGV, TOD. For stream unsupported local video to Chromecast and watch on TV? What we need to do is to transcode these formats to Chromecast playable MP4 format. To get this goal, we need Pavtube Video Converter Ultimate. Video Converter Ultimate enables you to convert nearly all kinds of HD video, TV shows and 2D/3D Blu-ray, DVD to the format Chromecast supports with high definition at ultra fast speed. Inside it, you can adjust the video codec, bitrate, frame rate and audio codec, channels and sample rate. In its review, you can learn more features about it.

Free download and install
          

Other Download:
- Pavtube old official address: http://www.pavtube.cn/blu-ray-video-converter-ultimate/
- Cnet Download: http://download.cnet.com/Pavtube-Video-Converter-Ultimate/3000-2194_4-75938564.html

Step 1: Load local video to the app

Click "File" menu to select "Load from folder" to import local movies to the program.


Step 2: Select output file format

From "Format" drop-down list, select "Common Video > H.264 Video(*mp4)" as the output file format to stream to Chromecast.


Step 3:  Adjust output profile parameters

For better playback local movies via Chromecast, you can adjust the output video parameters according to your TV video playback specifications.


Step 4: Start to convert

Carry out the conversion process by hitting right-bottom "Convert" button to start the process.

With the second method, you can stream unsupported local video to Chromecast and watch on TV with a big screen. If you like, you even can add text watermark to your video. You also can stream your H.265, Blu-ray, DVDiTunes to Chromecast.

Related Articles

Thursday, July 2, 2015

How to Watch ISO Movies in 3D With Nvidia 3D Vision?

Many people don’t know how to watch ISO videos on the PC using Nvidia 3D Vision in 3D effect. For this, some of them ask for help in relevent forums. I happen to solved this problem by myself recently so here i will share my thread for those still do not get the way. The follow is a question i saw on the web:

“Howdy all, I recently got the new Nvidia 3D Vision kit for my birthday gift and I have upgraded my computer to a 3D gaming machine. I have played Death Track Resurrection, Dungeon Runners  and many other 3D popular games. Now, I am ready to bring the 3D movie experience to my 3D PC with Nvidia 3D Vision and watch 3D movies in the comfort of my home. I have plenty of ISO movies that I purchased and i want to make side-by-side MP4 videos from every ISO movie so that I can view them on my PC using Nvidia 3D Vision. I have no video editing tool in my hand now. So any idea do you have and please tell me the steps. Thank you in advance.”

Yesterday, i saw someone ask for assistant in Roxio Community and I recently used a easy-to-use Blu-ray Ripper by coincidence that can recommend to him to backup ISO to Nvidia 3D Vision in side-by-side MP4 video. Pavtube BDMagic is exactly the one i want to recommend. With it, you can enjoy wonderful 3D movie experience by your Nvidia 3D Vision. On the one hand, it can convert all your ISO movies to SBS MP4 videos for true theater entertainment at home with ultra fast speed.. And on the other hand, it also enables you to rip your 2D/3D Blu-ray disc and folders and DVD to MP4 in 3D side-by-side, Top-Bottom and Anaglyph effect with ease. You are allowed to set the 3D depth to adjust the 3D effect as well.

Free download and install: 
          

Other Download:
- Pavtube old official address: http://www.pavtube.cn/blu-ray-ripper/
- Cnet Download: http://download.cnet.com/Pavtube-BDMagic/3000-7970_4-75922877.html

Steps to backup ISO to Nvidia 3D Vision in SBS MP4

Step 1: Load ISO movies to software

Launch ISO to Nvidia 3D Vision converter. Click "File" in top left corner and then follow "Load IFO/ISO" to import ISO movie. Mac users can try the Mac version ISO to Nvidia 3D Vision converter.


Step 2: Select format and set profile

Tap on Format bane and open profile list, choose “3D Video” and trace to “MP4 Side-by-Side 3D Video(*.mp4)”.


Tip: If necessary, you could adjust video codec, bitrate, etc to get better quality 3D MP4 video. Meanwhile, you can choose 3D Depth in Profile Settings to avoid images misaligned. (Read the differences between Anaglyph 3D and Side-by-Side 3D)


Step 3: Convert ISO to Nvidia 3D Vision

Hit on the “Convert” button and ISO to MP4 Side-by-Side conversion begins. When the conversion is done, and now you can locate it by opening the output folder.

With this process, you can watch ISO in 3D with Nvidia 3D Vision comfortably at home. If you are keen on 3D enjoyment, you can still use this software to rip Blu-ray to Oculus Rift DK2 or transfer 3D Blu-ray to Samsung Gear VRfor your hobby.   

Related Articles:

How to Import DVD to Final Cut Pro X for Editing on Mac?

People like creating and producing personal videos to put into YouTube for grabbing others’ eyes. When you need to edit videos on Mac OS, you may be used to select Final Cut Pro X, which is a revolutionary application for creating, editing, and producing the highest-quality video. But if your source videos are some old family, personal movies having burned into a DVD or old DVD discs you bought, you will seem to be at your wits end. Because Final Cut Pro X maybe support some camera videos but not DVD videos. So if you want to copy DVD video to FCP X to edit. That will let you down for FCP X can’t read DVD video natively. What if you want to import DVD to Final Cut Pro X for create? 

Don’t worry! We just need a little extra steps to transfer DVD to FCP X on Mac through ripping DVD to FCP X compatible video format, like ProRes. For this goal, we need a user-friendly DVD Ripper - Pavtube BDMagic for Mac. This DVD Ripper can easily rip and backup DVD to FCP X no matter it is encrypted DVD disc or unencrypted family DVD video with ultra fast speed. It enables you to merge several video clips into one file or trim a overlong video to a shorter one. (If you want to preserve multi-track from DVD ISO image file, you maybe should select Pavtube ByteCopy.)

Free download and install:
          

Other Download:
- Pavtube old official address: http://www.pavtube.cn/blu-ray-ripper-mac/
- Cnet Download: http://download.cnet.com/Pavtube-BDMagic/3000-7970_4-76177782.html

How to import DVD to Final Cut Pro X in ProRes format?

Step 1: Add DVD video to software

Run DVD to FCP X Software on your Mac and load your DVD video by clicking the “File” icon. This programme automatically choose the main video content to rip but If you have several clips and want a whole video, tick all the clips and then mark “Merge into one file” underneath the preview window.


Step 2: Select target video format

Click the format bar to navigate to “Final Cut Pro” and then”Apple ProRes 422 (HQ) (*.mov)”. (Learn Apple ProRes Codec Types)


Tip: If your video is overlong or you just want some certain fragment, you can use the built-in video editing tool to trim video footage.


Step 3:  Start DVD to Final Cut Pro X conversion

After choosing the right and suitable video format for Final Cut Pro X, click the big red button on the right-bottom of the interface to start conversion from DVD to Final Cut Pro X.

After conversion, run Final Cut Pro X on your Mac, and click “File” and “Import” to load the ripped video to Final Cut Pro X. Then you can edit your fovarite movie and make a personal edition blockbuster. If you wants more to show on your YouTube as a “Hollywood Director”, you even could backup your Blu-ray to Final Cut Pro X on the shelf to create more higher quality movie.

Related Articles:

Monday, June 29, 2015

Import iTunes Movies to Galaxy Note 4 for Gear VR

Question:
 “I used to buy movies from iTunes and i have paid plenty of money for this. Yesterday, my new Samsung Gear VR was to my hand and unfortunately, I found that i couldn’t play my iTunes movies in Gear VR. I even couldn’t put iTunes movies to my Galaxy Note 4 for viewing via Gear VR. I spent a whole afternoon to search the solution and desperately had to give up. I don’t want to pay another plenty of money for Gear VR watchable movies. Who can give me a step-by-step guide to import my iTunes movies to Gear VR? I’m really a little dumb for this high-tech products. ”

From this question, we are aware that although many people are interested in the newest virtual reality headset - Gear VR,(Learn 10 Awesome 3D VR Glasses/Headset review. ) they will find enjoy external movies , especially iTunes movies, with Gear VR, will not as easy as they expected. All iTunes movies have DRM protection which leads to the failure playback by Gear VR. iTunes movies authorize to PC but not Samsung Gear VR. So if you want to watch iTunes movies through Samsung Gear VR, you must firstly remove the DRM protection of iTunes movies and secondly convert DRM-free movies to side-by-side 3D MP4/MKV for Gear VR.

A economical and effective way to reach the goal is to use ChewTune + Video Converter Ultimate from Pavtube. This powerful software bundle will help you remove iTunes DRM protection with ChewTune first and then use Video Converter Ultimate to convert DRM-free movies to Gear VR suitable formats like SBS 3D MP4/MKV video format. Separately, Pavtube ChewTune is a professional DRM Removal Software to remove DRM protection with fast speed without Trojan. And Pavtube Video Converter Ultimate can convert 2D/3D Blu-ray, 3D movies, DVD, HD videos, TV shows, H.265 movies to various video formats, including SBS 3D MP4/MKV/MOV/AVI/WMV for Samsung Gear VR or other 3D Glasses with high resolution.

For the original price is ChewTune $29 and Video Converter Ultimate $65, there is a cheaper bundle in total $74.9, saving $19.1 to download.

                     Software Bundle for Windows | Software Bundle for Mac

Steps to Import iTunes movies to Galaxy Note 4 For Gear VR

Step 1: Download and install iTunes DRM Removal 


Step 2: Add iTunes movie to iTunes Removal 

Launch iTunes Removal software and click the icon with plus symbol to add iTunes movie. Or you can drag and drop the source movie to the programme directly.


Step 3: Select output format and star the conversion

In the "Format" drop-down list, click "Common Video"  and to choose "Same as the source video" as output format. Then hit the red “Convert” to start the conversion.

Step 4: Download DRM-free video to Gear VR Converter


Step 5: Transform DRM-free movies to SBS 3D MP4

Run Video Converter Ultimate. Click “file” to input DRM-free iTunes movies this software.


Step 6: Select the target format and start 3D MKV conversion

Click “Format” bar and choose “3D Video”. In the format list, specify “MKV Side-by-Side Video(*.mkv)” as the target format. ((Learn Differences Between Anaglyph 3D and Side-by-Side 3D) When format setting done, hit “Convert” to start convert DRM-free iTunes movie to SBS 3D MKV for Gear VR.


Step 7: Import SBS 3D MKV video to Gear VR

  • Firstly, locate your created movie and open your MicroSD card file directory.
  • Secondly, in the directory, navigate to Oculus > Movies > Your Movies. 
  • Thirdly, in “Your Movies’, create a new one folder named “3D”. In this folder you should place your side-by-side 3D videos. 
  • Fourthly, put your SBS 3D video to “3D” and plunge the MicroSD card into your Galaxy Note 4.
  • Finally, slide Note 4 into your Gear VR and put the device on.

According to this steps, you can enjoy your iTunes moves smoothly on Galaxy Note 4 via Gear VR in 3D effect at home. 

Related Articles:

Transfer 2D/3D Blu-ray to iTunes for iOS Device Syncing

Abundant of iTunes users asked online that how to transfer 2D/3D Blu-ray files to iTunes for syncing to their iOS devices. As is known to all, no matter Blu-ray disc, Blu-ray Folder, Blu-ray ISO Image File, iTunes doesn't accept any one of those. So you are required to seek help from an effective yet versatile 2D/3D Blu-ray ripper to rip and convert 2D/3D Blu-ray to iTunes video file format. 

What video/audio formats does iTunes support?

Before converting 2D/3D Blu-ray to iTunes, you should know what video and audio formats that iTunes supports.

Best Video Formats for iTunes:
  • MP4, generally speaking, can be played in iTunes. However, MP4 video has its codec limitations that MP4 video encoded as 540 kbit/s with H.264 and an approximately 128 kbit/s AAC audio track is regarded as the best video format for iTunes. And, MP4 video encoded with other codec and sample rate will meet waterloo but nothing in iTunes.
  • MOV uses a proprietary compression algorithm developed by Apple Computer, which is the standard and best video format for QuickTime. It is well-known with its unbeatable high quality so that it’s warmly-received by masses of iTunes users.
  • M4V is widely utilized to encode video files, such as TV episodes, movies, and music videos, in iTunes Store. In general, the copyright of M4V files may be protected by using Apple's FairPlay DRM copy protection.
Tip: To remove DRM protection from iTunes videos, you can read the Best DRM Removal Review.

Best Audio Formats for iTunes: 
  • MP3, AIFF, WAV, AAC, Apple Lossless(.m4a)
What 2D/3D Blu-ray to iTunes Ripper can you use?

In the current market, there are many 2D/3D Blu-ray to iTunes Ripper can be chosen. According to features and device cost, Pavtube BDMagic is recommended. Several reasons are listed here to show why choose Pavtube BDMagic:
1. Fastly rip 2D/3D Blu-ray to iTunes playable MP4/MOV/M4V formats.
2. Transcode Blu-ray to iPhone, iPad, Apple TV and other iOS device friendly video format.
3. Convert audio to AIFF, WAV, AAC, etc, format that Apple products support.
4. Rip 2D/3D Blu-ray, Blu-ray ISO File, DVD, DVD VOB File to regular formats compatible with portable devices, 3D Glasses, game consoles, HD players, cloud storage and servers.
5. Possess the feature of easy-to-use and support 6X acceleration conversion.
6. Capability of Full Blu-ray Copy and Directly Blu-ray  Copy with 5.1/7.1 channel sound.
7. Trimming and cropping your Blu-ray movies with built-in video editing tool.

Tip: Want to know more about BDMagic, read Blu-ray Ripper Review.

Free download and install: 
          

Other Download:
- Pavtube old official address: http://www.pavtube.cn/blu-ray-ripper/
- Cnet Download: http://download.cnet.com/Pavtube-BDMagic/3000-7970_4-75922877.html

How to transfer 2D/3D Blu-ray to iTunes with Pavtube BDMagic?

Step 1: Load Blu-ray movie to the programme

Put the source Blu-ray disc into BD drive and launch 2D/3D Blu-ray to iTunes Converter. When the interface pops up, click “Load from disc” to load the Blu-ray movie into this converter.


Step 2: Select output format 
In the format pane, navigate “HD Video” > “H.264 HD Video(*.mp4)” as the output format. 


Step 3: Set the parameters

Hit the “Setting” close to the format bar to select the desired video codec, size, bitrate, frame rate and audio codec, sample rate, bitrate and channel for better video playback.


Step 4: Convert 2D/3D Blu-ray to iTunes

After all setting done, you can click “Convert” to start converting 2D/3D Blu-ray to iTunes process. When conversion finishes, locate the created movies by opening output folder.

With this 2D/3D Blu-ray to iTunes Converter, you can easily get iTunes suitable format video. Then, you can sync the converted Blu-ray movies to iPad, iPhone, Apple Smart TV and other iOS device for streaming on the move. 

Related Articles:

Thursday, June 25, 2015

Watch 3D Blu-ray via Oculus Rift DK2 on Mac

Oculus Rift DK2 is the top virtual reality headset display comparing with other 3D Glasses. And it is no doubt that Blu-ray movie is its best partner. Combining the high resolution and definition of Blu-ray movies with the 1280×800 to 1920×1080 OLED panel of Oculus Rift DK2, containing positional tracking sensors and the system of optical lenses, you will enjoy fantastic HD 3D movie experience. Unfortunately, Blu-ray with protection can’t be played via Oculus Rift DK2 direcly. You must rip 3D Blu-ray to 3D MP4 first.

When speaking to converting Blu-ray to MP4 on Mac, some people are accustomed to use MakeMKV to remove Blu-ray disc protection and output as MKV file and then transform MKV to MP4 with Handbrake. But when they want to rip 3D Blu-ray to 3D MP4 for viewing on Oculus Rift DK2, which doesn’t have Blu-ray drive to play Blu-ray disc directly, they find the combination of MakeMKV and Handbrake will be out of work for Handbrake only supports outputting MP4/MKV. So taking full advantage of your Oculus Rift DK2 with 3D Blu-ray, you should need a MakeMKV + Handbrake Alternative on Mac.

The best MakeMKV + Handbrake Alternative on Mac is Pavtube iMedia Converter for Mac. It gathers ripping and converting Blu-ray into one software. With the ability of ripping the latest Blu-ray disc under the updated technology of protection in ultra speed, it is able to convert 3D Blu-ray to MP4 in side-by-side, top-bottom, anaglyph 3D effect for your Oculus Rift DK2 keeping original video quality and high definition. Besides, it can merge  several segments into one file for smoothly viewing.(Read Top 8 iMovie Converter for Mac)

Free Download and install:
          

Other Download:
- Pavtube old official address: http://www.pavtube.cn/imedia-converter-mac/
- Cnet Download: http://download.cnet.com/Pavtube-iMedia-Converter/3000-2194_4-76177788.html

How to Convert 3D Blu-ray to 3D MP4 to Oculus Rift DK2 on Mac?

Step 1: Import your Blu-ray movie

Launch Pavtube iMedia Converter for Mac, clicking the "File" icon to import Blu-ray movie.


Step 2: Specify the target format

Click the format bar to choose "3D Video" > " MP4 Side-by-Side 3D Video(*.mp4)".


Tip: if your Blu-ray movie has several subtitles, you can hit the “Subtitle” on the interface to choose desired subtitle.


Step 3: Start the process

After all settings are done, click “Convert” to start the conversion.

When the conversion is finished, you can watch 3D Blu-ray via Oculus Rift DK2. Evenmore, you can enjoy this 3D MP4 movie on Samsung Gear VR. With the MakeMKV + Handbrake Alternative, you also can convert Blu-ray to MKV, MOV,AVI with ease or enjoy your Blu-ray on iPadPlex ServerApple TV, iTunes, etc.


Related Articles: