Tuesday, November 10, 2015

Pavtube Thanksgiving Deals - 40% OFF Blu-ray/DVD Ripping/Copying Tools

Thanksgiving Day is coming. Some of you are probably planning the Thanksgiving menus for your family while some are ready for selecting the best Thanksgiving present for their parents. With great blessing and best wishes, Pavtube Studio also prepared a big gift for their consumer - Thanksgiving Promotion 2015 to celebrate Thanksgiving Day with our friends. Focusing on product quality and customer needs, Pavtube offers up to 40% discount for hot products to reward our customers.


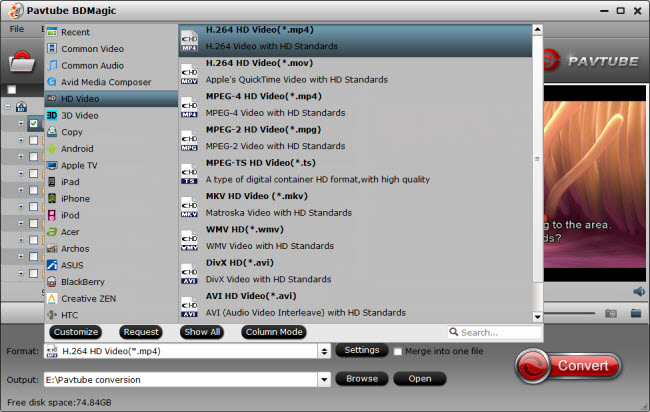
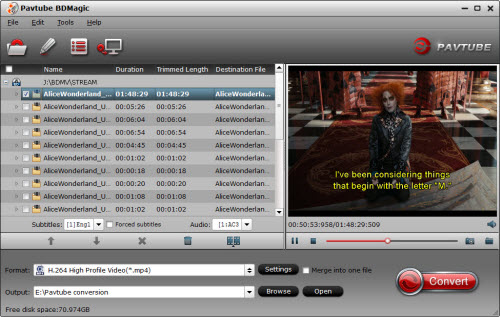
Thanksgiving Day always comes with movies. I believe you must have prepared some Thanksgiving movies for enjoy with your family after dinner. With this wish, how can you bear the incompatibility issue when playing Thanksgiving Blu-ray/DVD movies on your HD TV, iPad, 4K Projector, etc. To avoid the embarrassing situation, you’d better rip the Blu-ray/DVD movies to your multimedia players with most compatible format and specs by using
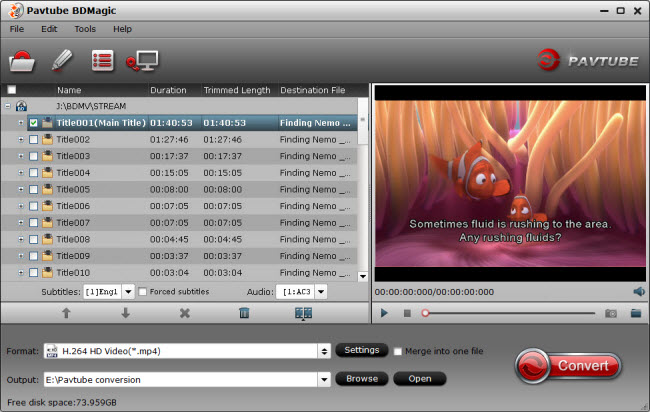
Pavtube BDMgic for Windows / Mac
Pavtube DVDAid for Windows / Mac
Pavtube ByteCopy for Windows / Mac

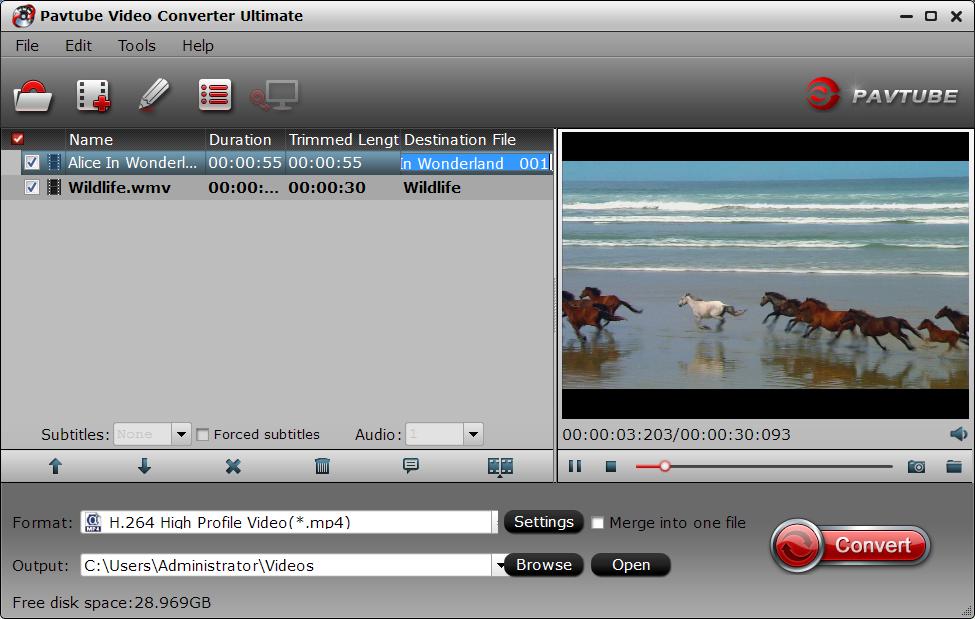
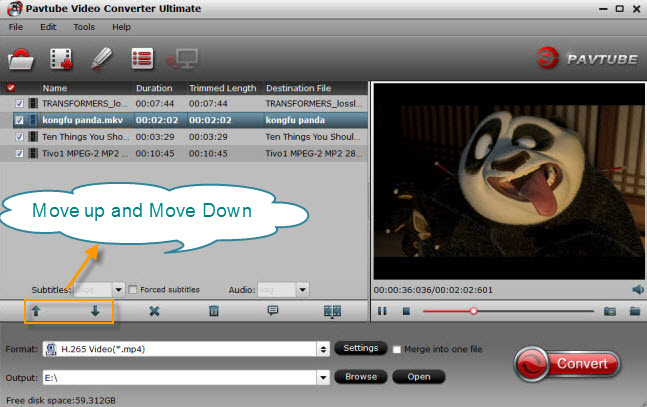
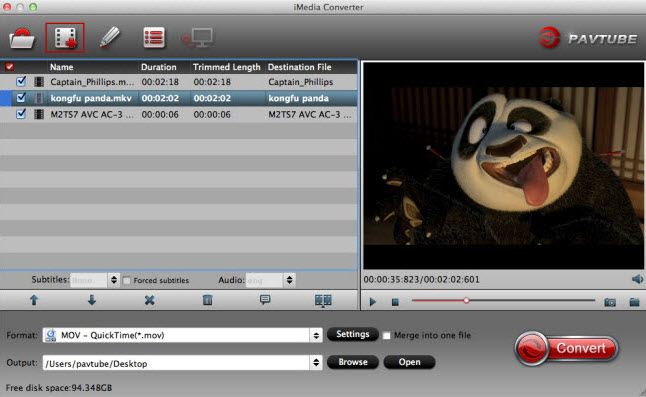
When enjoying the Thanksgiving movies and having the Thanksgiving dinner together, how can you not record the scene to remember the warm time? After you record the happy time, you maybe want to edit the shooting in iMovie, FCP, Premiere Pro CC, etc before you sent it to your other family members or share it on Facebook. While putting the shoot into video editing program, you probably need the help of Pavtube Video Converter Ultimate and iMedia Converter for Mac, which can convert your HD/4K shoot to H.265 MKV/MP4, HD MP4, QuickTime, MOV, ProRes, AIC, DNxHD, MPEG-2, WMV, H.264, MPEG-4, etc. for your FCP X, iMovie, Premiere Pro CC, Sony Vegas Pro 13, Windows Media Player, VLC, Youtube, etc. On Windows 10/8.1/8/7/XP and Mac OS X 10.11 El Capitan, 10.10 Yosemite, 10.9 Mavericks, 10.8 Mountain Lion, 10.7, 10.6, 10.5.

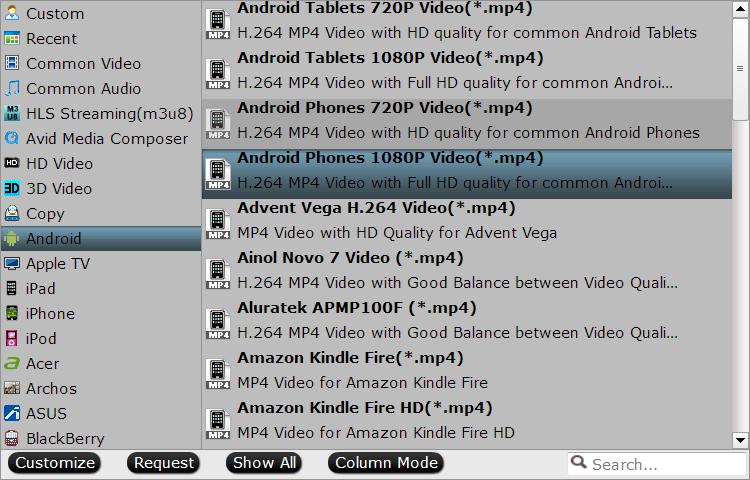
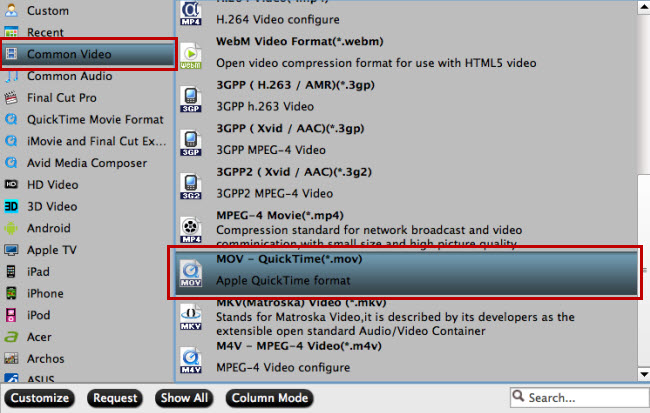
Pavtube Video/BD/DVD software can convert Blu-ray/DVD, 4K/SD/HD video in any format to H.265 MP4/MKVM3U8, MP4, MOV, MKV, AVI, M4V, etc. Especially, ByteCopy can rip Blu-ray/DVD to lossless MKV keeping multi-track subtitle/audio and all chapter markers. What’s more, Pavtube adds optimized preset profile for main digital products, like TV series, iPad, iPhone, Samsung, Sony, PS3/PSP, Xbox One/360, Android Tablet/Phone, Surface, etc.

All of the products can be get now at up to 40% off discount. Below is the list:

40% OFF Pavtube DVDAid for Windows/Mac

Original price: $35
Now: $21

Reasons to choose Pavtube DVDAid


2. 30% OFF Pavtube BDMagic for Windows/Mac

Original price: $49
Now: $34.3

Reasons to choose Pavtube BDMagic


3. 20% OFF Pavtube ByteCopy for Windows/Mac 

Original price: $42
Now: $33.6

Reasons to choose Pavtube ByteCopy


4. 20% OFF Pavtube Video Converter Ultimate for Windows/Mac

Original price: $65
Now: $52


You won’t get a Blu-ray/DVD Software at such low price in normal days. So if you have a plan to purchase a BD/DVD/Video Converter in the near future, why not push the schedule forward and get it in Pavtube Thanksgiving Promotion activity.

Additional: To help you make a wise choice, I did a deep review and comparison between the four backup tools. You can check out the differences and then choose the favorite to create high quality Blu-ray/DVD/ISO/4K/HD Video and Movie backups: Pavtube Softwares Comparison: ByteCopy vs BDMagic vs DVDAid vs Video Converter Ultimate

Source: http://i-loveshare.com/pavtube-thanksgiving-coupon/

Related Guides

1. Pavtube DVDAid for Windows/Mac Guides

2. Pavtube BDMagic for Windows/Mac Guides

3. Pavtube ByteCopy for Windows/Mac Guides

4. Pavtube Video Converter Ultimate for Windows/Mac Guides

That’s All!

PS. Have more questions about how to download, buy and use our Blu-ray/DVD Ripper, various Video Converter programs, please feel free to contact us>> or leave a message on our Official Facebook.

Sunday, November 8, 2015

Rip DVD to Netgear ReadyNAS for Viewing on Amazon Fire TV via Plex

More and more people choose to make a digital copy for their DVD collection so that they can watch their favorite DVD movies on Amazon File TV via Plex conveniently. Owning to the enormous demand of storage , DVD users, who are planning to rip DVD for Amazon Fire TV, need a central storage device, like a Netgear ReadyNAS. However, from the feedback of community.netgear.com, it seems that ripping DVD to Netgear ReadyNAS for watching on Amazon Fire TV via Plex is not easy as we imaged.


To some degree, when many people try to rip DVD to Netgear ReadyNAS for Amazon Fire TV for watching via Plex, they will be stuck in the common ground between what the player supports and what plex supports. Based on the specification of Amazon Fire TV, TS would be the best format for the player. It carries all the common surround sound audio (DTS, etc). But Plex doesn't support TS. It might possibly support m2ts (which is related) - the information I see on the plex forum is a bit inconclusive on whether that needs transcoding or not.

ReadyDLNA does support TS, so you could try that. I’m suggesting converting just one file, and give the TS output a different name just for testing. Then add it to a Plex library and see if it works. 

You can use some free programs to rip DVD to TS for testing but I don’t know which one can output TS file. But in some top DVD rippers review, I saw some good paid DVD rippers like Pavtube Video Converter Ultimate. This software performs well in DVD to Netgear ReadyNAS for Amazon Fire TV via Plex conversion. It can decrypt any copy-protected and region-locked DVD to TS for Amazon Fire TV. For those who have ripped DVD to MKV with MakeMKV, you can try remuxing it to TS using Pavtube Video Converter Ultimate. 

If you tested TS file and found that it can’t be played on Amazon Fire TV via Plex through Netgear ReadyNAS, you only can adopt MP4 format. MP4 will be also played on Amazon Fire TV (and works with plex), however, you will lose DTS audio for sure. Not sure if dolby digital (AC3) will play or not - you might be limited to stereo audio. This software can allow you to adjust the video and audio parameter, like channel, size, codec. etc so that you can reset the parameters to be more compatible with Amazon Fire TV.

In addition, Pavtube Video Converter Ultimate is designed for Windows users, if you are a Mac user, please turn to the equivalent product iMedia Converter for Mac, which has updated to support Mac OS X El Capitan. Now, get the right version on your computer and follow the simple steps to rip DVD to TS or MP4 for Amazon Fire TV. 

Free download and install
          

Other Download:
- Pavtube old official address: http://www.pavtube.cn/blu-ray-video-converter-ultimate/
- Cnet Download: http://download.cnet.com/Pavtube-Video-Converter-Ultimate/3000-2194_4-75938564.html

How to rip DVD to Netgear ReadyNAS for viewing on Amazon Fire TV via Plex?

Step 1: Add DVD video to app

Simply click on “File” to load DVD movies to the software. It allows you to select the subtitle and audio track you want below the chapter list. 


Step 2: Select the output format

Click “Format” and you will see many profiles here. You can search “TS”, “MP4” format in the right bottom search box directly. 


Tip: From the specification of Amazon Fire TV, the video in H.264/AVC codec can be up to 1080p and 30 fps. So you can hit on “Settings” to open settings window where you can adjust the video size to 1080p and frame rate to 30 fps. Since AC3 is not sure playable or not, you can choose AAC and 5.1 channel for audio. If 5.1 sound is not supported, it will be limited to stereo audio. 


Step 3: Start to rip DVD to Amazon Fire TV

After all settings, just press “Convert” icon below the preview window. Once the process ends, you can locate the generated file in output folder.

Now, put the ripped DVD to Netgear NAS and install a Plex on it. Then install a Plex on Amazon Fire TV, too. Try again to play DVD videos on Amazon Fire TV via Plex through Netgear ReadyNAS. 

If it doesn’t work, maybe you should try other option that is to get a player that supports more formats. WDTV Live and PCH are popular choices. Many can access your media directly using SMB/CIFS and NFS - so there is no need for plex or ReadyDLNA at all.

Related Software:
BDMagic for Windwos/Mac - The best Blu-ray solution to rip and backup any commercial and region-locked Blu-ray to H.265, M3U8, MP4, MKV, AVI, FLV, etc.  
DVDAid for Windows/Mac - Capacity of ripping copy-protected and homemade DVD to iPhone 6S, iPad, Surface Pro, Synology NAS, Seagate Wireless Plus, etc with suitable format.
ByteCopy for Windows/Mac - It can rip Blu-ray/DVD to lossless MKV keeping multi-track subtile/audio and all chapter markers.

Related Articles:

Sunday, November 1, 2015

Digital DVD/Blu-ray Collection to Personal Cloud Storage in H.264 MP4 Format

People rip Blu-ray/DVD discs to personal cloud storage for various reasons but for keeping original Blu-ray/DVD disc safe must take up the biggest percent in the various reasons:

“I have a large DVD/Bluray Collection and want it digital so my grandchildren and kids do not damage the originals. I want to rip these Blu-ray/DVD disc to my personal cloud storage. I bought a personal cloud device. Seagate but I have also used Western Digital (My Cloud) ... Ipads, PCs, Mac, Android can all access them and view without trouble.”

If you also have the idea on digital your Blu-ray/DVD collection, ripping the Blu-ray/DVD disc to personal cloud storage must be the best idea. Since it not only can protect your original Blu-ray/DVD disc, but also give the access to your various multimedia players like iPad, iPhone, PC, Mac, Android Phones, Tablets to view Blu-ray/DVD movies directly without any troubles.

Here, I would introduce Pavtube BDMagic to help you digital Blu-ray/DVD to personal cloud including Seagate Wireless PlusWestern Digital MyCloud in suitable video format, such as MP4. Of course, if you want H.265, M3U8, MKV, MOV, AVI, FLV and any other popular format, it also can give you.

If you just want to store your Blu-ray/DVD movies to personal cloud storage to view in just one kind portable media players, like iPadApple TViPhone 6, it can offer you the best preset for you which you don’t need to adjust the video and audio parameters on your own. (Learn more in its review.)

Free download and install: 
          

Other Download:
- Pavtube old official address: http://www.pavtube.cn/blu-ray-ripper/
- Cnet Download: http://download.cnet.com/Pavtube-BDMagic/3000-7970_4-75922877.html

How to Digital Blu-ray/DVD Collection to Personal Cloud Storage?

Step 1: Load Blu-ray/DVD movie 

Click “File” to load your Blu-ray/DVD movie to this program. It will automatically choose the main content to convert. If there are several language subtitles in your Blu-ray/DVD movies, you can select the language subtitle you want to show in your movie by “Subtitle”.


Step 2: Specify output format

In drop-down format list, you can choose “HD Video” > “H.264 HD Video(*.mp4)” as output format for nearly all laptops, tablets, mobile phones can play MP4 videos. 

Learn Also: Rip 300 DVD Collection to External Drive for Dell/Lenovo/Toshiba Laptops

 
Tip: If you just want to digital your Blu-ray/DVD for more convenient organization and management, you also can choose to full disc copy Blu-ray/DVD or main title copy

Step 3: Start backup Blu-ray/DVD to MP4

After all settings done, hit on the “Convert” button and Blu-ray/DVD to H.264 MP4 for personal cloud storage conversion will start. After the conversion completes, open output folder and you will find the converted movies.

Now, the Blu-ray/DVD digitalize ends. You can move them to your personal cloud storage and play them on your various mobile multimedia players.

Supplement:  Move Video, Music and Files to Seagate Wireless Plus

Please follow this procedure to load content wirelessly onto your Wireless Plus device in Windows using SAMBA. The device must be connected to your computer via WiFi before proceeding:

1.Power on the Wireless Plus device.
2. Locate the Wireless Plus device in your wireless access menu.
3. Select the Wireless Plus device and enter a password if you have set one up.
4. Double-click on (My) Computer.
(Windows 8: Press the Windows key () + D, then select File Explorer (.)
5. Select Map Network Drive.
6. In the Folder field, type:
\\172.25.0.1\Public. You can also change the default drive letter to a letter of your choice, as long as that letter is not already taken by a different device. The drive is now listed in (My) Computer and Windows/File Explorer:
7. Drag and drop or copy and paste your media files to the drive.

Please note that transferring large files or many files wirelessly may result in low performance. If you are moving large files or many files to the drive, Seagate recommends you connect to the computer using the USB cable instead.

Related Articles:

Thursday, October 29, 2015

Top 5 Torrent Sites 2016 to Free Download Full Movie Torrents

Not everyone like expensive Blu-ray/DVD? Neither everyone feel like going to the cinema to watch every new flick. More and more people tend to download HD movies form torrent sites, which can make them catch up the latest blockbusters and don’t need to pay. Here, to meet the desire, the article list the top 5 torrent sites 2016 to download full Hollywood/Bollywood  movies freely.

Top 1: Torrentz

Torrentz is another leading winner of the top 10 torrent sites of 2016. Different from other best torrent sites 2016 listed herein, Torrentz is not a torrent directory and tracker, which means that it does not host any torrent files for direct download but will redirect visitors to around 32,066,799 active torrents from 126,582,915 pages on 26 domains. It works like Google and helps users to free download HD 1080P/720P Hollywood/Bollywood movie torrents free and fast.

Top 2: KICKASSTORRENTS

KickassTorrents was founded in 2009 and surpassed The Pirate Bay in traffic this year, even before it went down. Battling various censorship efforts the site has burned through a few different domain names over the years. Most recently it switched to the Somalian Kickass.so address.

Top 3: YTS

YTS, also known as YIFY, is another popular pirate bands which will release several top 2016 movies on a weekly basis. As the site claims, it help users to free download movie torrents in 720p, 1080p and 3D quality, all at the smallest file size. Currently, more than 500 high-quality movie torrents are available for free download. With millions of unique visitors every day, YTS has a well-deserved place within the top 10 best torrent sites 2016.

Top 4: ExtraTorrent

ExtraTorrent is the world's largest Bittorrent system with a total of 2823368 torrents and of course one of the top 10 best sites to download torrents 2016 to download movie video for free. Extratorrent provides various rich resources including movies, TV, music, anime, games, and even adult contents. This is one of the most popular top torrent sites 2016 with millions US unique users. Users can download latest movie torrents free and fast, with no registration required.

Top 5: THE PIRATE BAY (COPIES AND CLONES)

At the time of writing The Pirate Bay isn't serving any torrents. However, there are several copies and clones of the site which, at least temporarily, take its place. OldPiratebay.org is currently the most popular and based on its recent traffic the site is already ranked at least 4th in this list.

Of course, there are other good torrent sites that you can choose. If you have other recommendation, just leave a message in the comment area. 

Tip & Trick: How to Successfully Play Torrent Sites Downloaded Movies on Mobile Device/Media Players?

From time to time, the movies you downloaded from these torrent sites probably can’t be played on your Windows Media Player, QuickTime, iPhone 6S, iPad Pro, etc for the format and codec incompatibility problem. Under this condition, you maybe need a video converter. The software I used to apply is Pavtube Video Converter Ultimate. This app can work in H.265, MP4, MOV, WMV, M4V, FLV, etc files and change them to another video format. It not only can output normal H.265/H.264 MP4, MOV, M4V, but also the M3U8, H.265 format, which is the absent function of most other video converters. You can learn its more features in its review

Good News: now the software is participating the Halloween Spirit Coupon. You can get the program at 40% off discount.

Free download and install
          

Other Download:
- Pavtube old official address: http://www.pavtube.cn/blu-ray-video-converter-ultimate/
- Cnet Download: http://download.cnet.com/Pavtube-Video-Converter-Ultimate/3000-2194_4-75938564.html

Tutorial: How to Convert Movies with Pavtube Video Converter Ultimate?

Step 1: Add source video

Launch and start the program on your computer, click "File" > "Add Video/Audio" or "Add from Folder" to import source files to the program. Click the "Move up" or "Move down" arrow under the video file displaying window to adjust your source video file order according to your own needs. 


Step 2: Choose output file format.

From the "Format" bar, select your desired output file format from "Format" drop-down options. I suggest H.264 MP4 format, which can be nearly accepted by all media players and portable devices.


Step 4: Convert movies to MP4

Press the right-bottom "Convert" button, a window will pop out with the conversion progress. The process of torrent movies to MP4 conversion begins,

When the conversion is completed, you can find your converted files by clicking "Open output folder". Then you can put it to anywhere you want.

Related Articles:

Monday, October 26, 2015

How to Play Blu-ray/DVD on Google Nexus 6P?

Google has announced a new smartphone  - Nexus 6P running Android 6.0(Marshmallow). Nexus 6P is narrower (78 vs 83 mm), thinner (8.3 vs 10.1 mm), and lighter (178 vs 184 grams) than the Nexus 6. As we all known, smartphone is more like a portable multimedia player nowadays. On the other hand, Blu-ray/DVD movies are the favorite of many movie fans. So from time to time, we need to copy these movies to our smartphones. Then we can enjoy them during our trip. So here, we are about to talk about the Blu-ray or DVD playback on Google Nexus 6P issue. 


No smartphone can play a physical DVD or Blu-ray directly. So if you want to enjoy your favorite Blu-ray movies on Nexus 6P, you have to rip Blu-ray disks to Nexus 6P supported format in advance. Before the process, you should learn what video format Nexus 6P can support.

Speaking of ripping Blu-ray, I recommend highly Pavtube BDMagic for Windows/Mac (Top 5 Blu-ray Rippers Review) for you. It is the all-in-one Blu-ray/DVD solution. It can not only rip encrypted and region-locked Blu-ray/DVD disc to Nexus 6P suitable MP4/MKV/M4V, etc formats, but also can backup Blu-ray/DVD to H.265, M3U8, MOV, etc with original video quality. Considering the limit of storage of Nexus 6P, this software can make you decide the size of output videos on your own by changing the bitrate and codec. Besides Xperia 6P, this Blu-ray ripper is also the best solution to play Blu-ray on iPhone 6S/6S Plus.

Free Download and install Pavtube BDMagic


Other Download:
- Pavtube old official address: http://www.pavtube.cn/blu-ray-ripper/
- Cnet Download: http://download.cnet.com/Pavtube-BDMagic/3000-7970_4-75922877.html

Guide to convert Blu-ray/DVD to Nexus 6P supported format

Step 1. Import Blu-ray/DVD sources

Download the software, install and launch it on PC. Then click "File" > "load from disc" to load Blu-ray/DVD disc to the program, when both Blu-ray or DVD disc exists, the program will load DVD disc first.


Step 2. Pick the best format for Nexus 6P.

Follow "Android" > "Android Phones 1080P Video(*.mp4)" in the format list as the output format both Nexus 6P.


Step 3. Adjust output file resolution (Optional)

Click "Settings" to open "Profile Settings" window, under video settings panel, select"1980*1020" as the final output file resolution for Nexus 5X, enter "2560 *1440" as the final file resolution for Nexus 6P.


Step 4. Start conversion from Blu-ray/DVD to Nexus 6P.

Click "Convert" button to start conversion from Blu-ray/DVD to Nexus 6P. The converting duration depends on the size of the files you want to convert.

After the conversion, you can transfer videos to your Nexus 6P via USB or FTP. Enjoy!

Further Reading:

Sunday, October 25, 2015

Pavtube 2015 Halloween Special Offer - Up to 40% Discount

Festivals are always the best opportunities to purchase the goods you were not willing to buy or had no ability to afford in the past days. 2015 Halloween is coming. Are you ready to open your wallet? To make your Halloween celebration even greater, Pavtube Studio has prepared a great Halloween Promotion – we are offering you a generous 40% Discount on our Blu-ray & DVD Softwares (Windows 10 and El Capitan supported).

Since Pavtube Studio offers many kinds of Blu-ray/DVD/Video softwares that you possibly don't know which one to choose, I can make a brief introduction and a recommendation to you.

Recommendation 1: If you often do video conversion process, you can take Pavtube Video Converter Ultimate and Pavtube iMedia Converter for Mac into consideration. It can accept any Halloween movie source, like Blu-ray/DVD disc and 4K/SD/HD online/local video in any format and transform them to nearly any popular video format you have ever seen.

Recommendation 2: For those who have plenty of Blu-ray discs, Pavtube BDMagic and Pavtube BDMagic for Mac will be the best choice. They are cheaper than the recommendation one but supply the same effect on Blu-ray/DVD Halloween movies.

Recommendation 3: DVD owners who just need to rip and backup DVD disc or copy DVD folder, DVD ISO/IFO can focus on Pavtube DVDAid and Pavtube DVDAid for Mac. It only can deal with DVD movies but it is the cheapest item.

Recommendation 4: Pavtube ByteCopy and Pavtube ByteCopy for Mac are for situation that your Halloween Blu-ray/DVD movies have several subtitles and audio tracks and you want to keep all the tracks and chapter markers while ripping and copying the discs. What's more, it enables you to extract FLAC/WAV audio from Blu-ray audio disc and extract SRT subtitle from Blu-ray movies.

Think about which one is the best choice for you so that you can solve your video conversion problem with the least money. Don't waste the money-saving chance on Halloween. Just do it!

Soure site: http://www.love-media-player.com/pavtube-halloween-coupons/

Top Video Converters for Mac OS X 10.11 El Capitan Review

Summary: The newest system of Apple, Mac OS X 10.11 El Capitan is already generating a lot of interest online. There are a few additions and upgrades that this new OS upgrade will bring to users. After updating the Mac 10.11, you may facing the dilemma, installing and lots of movie files cannot work.

Hot Search: H.265 to Mac 10.11Different Regions DVD on Mac | Blu-rays on Mac El Capitan 

Well, you have to know that a number of video converters for Mac have stopped working after updating to the newest OS X 10.11 El Capitan. In this case, installing and using the best OS X 10.11 El Capitan Video Convertor to convert MKV, FLV, AVI, MOV, etc on Mac OS X 10.11 El Capitan is the thing you need to do.

Here let's talk about a suitable Video Converter that really works on Mac OS X 10.11 - Pavtube iMedia Converter for Mac. (Here is the review.)
  
What is clear is that iMedia Converter for Mac is compatible with all Mac OS, including 10.11 El Capitan, 10.10 Yosemite, 10.9 Mavericks, 10.8 Mountain Lion, 10.7 Lion, Snow Leopard 10.6, Leopard 10.5. This video converter for Mac OS X 10.11 is among those most likely to be capable of handling all SD, HD including H.265, MTS, MXF, MOV, MP4 and 4K videos, etc. It is much better capable of converting downloaded YouTube videos to MKV, WMV, MOV, MPEG, iPhone, iPad, Android, etc on Mac OS X El Capitan at one go. Aside from this, there are many accessible video editing tools that you can find this software for video editing. You can cut, add caption, add audio, and a lot of things to your video.
   
Free Download this Best Video Converter for Mac OS X 10.11 El Capitan: 

   
Other Download:

- Pavtube old official address: http://www.pavtube.cn/imedia-converter-mac/
- Cnet Download: http://download.cnet.com/Pavtube-iMedia-Converter/3000-2194_4-76177788.html

Step-by-Step: Convert HD Videos on Mac OS X 10.11 El Capitan

Step 1. Load original Video files. Click “Add Video” button on the main interface to load your MKV, WMV, MOV, MPEG files to the program. (Drag&Drop function is included.) 


Step 2. Click on the dropdown menu of “Format” and then move your pointer to “HD video” > “H.264 HD Video (*.mp4)” which is the compatible format for Mac


Tips: With the right settings you can retain the quality of the original videos while also saving space. This is particularly helpful when streaming over your network, depending on your network quality. Simply click Settings bar and you can tweak the settings to your satisfaction and even save it as preset.

Step 3. Start Video to Mac Conversion. Finally, hit the “Convert” button at the bottom of the main interface to start the conversion.

When everything is OK, simply click the Convert button to begin the conversion from MKV to Mac OS X 10.11 El Capitan format. When the conversion is finished, you can import and play your videos to QuickTime Player, iTunes or transfer them to iPhoneiPad via iTunes with ease. 

Tip: For Windows users, Pavtube Video Converter Ultimate is also a helpful app to encode videos for further usage. A nice info is that Even for the latest codec H.265/HEVC, it can hold well. Besides, it also supports encoding to M3U8by the latest version. 

Read More: